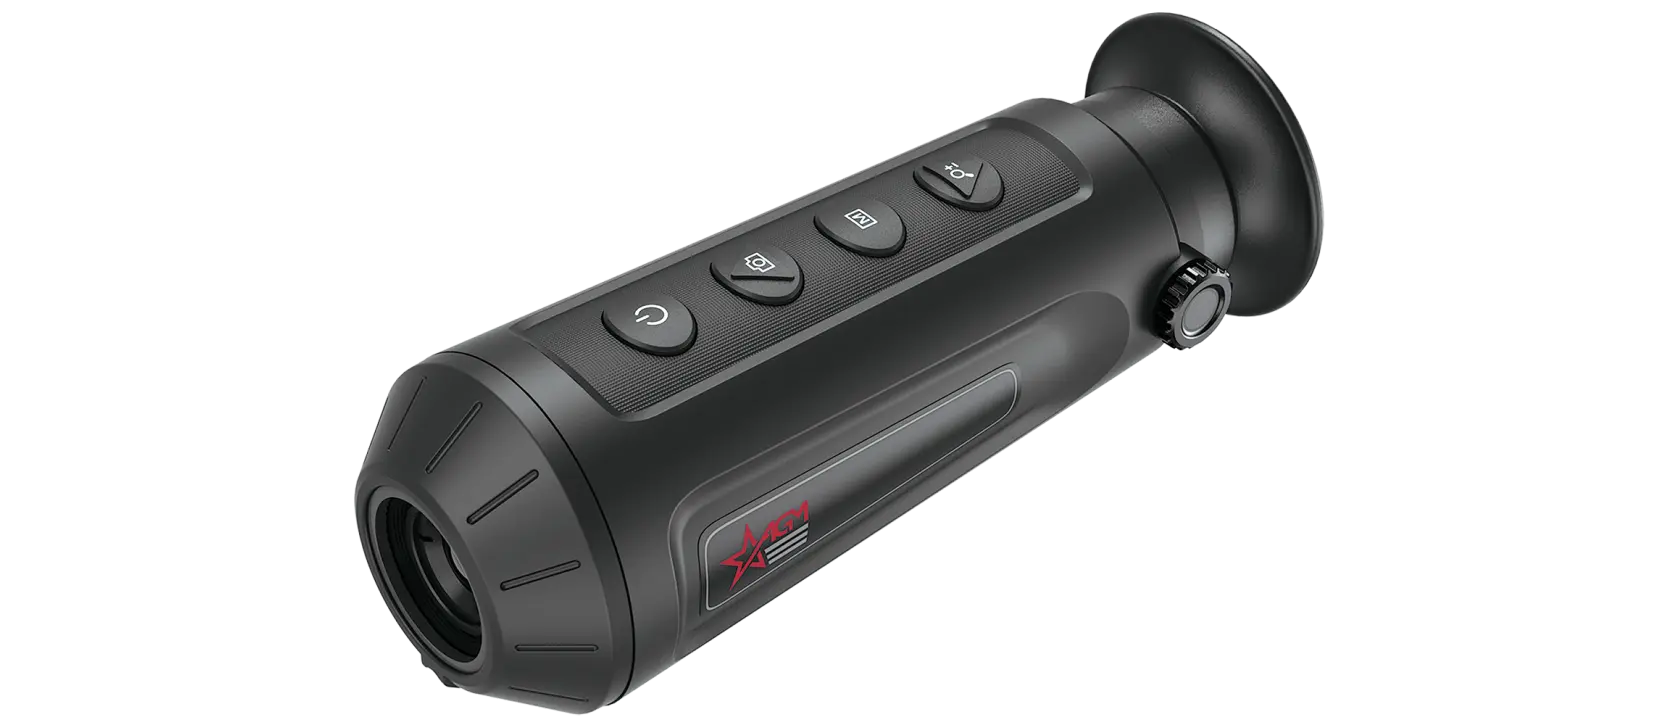
Thermal Monocular Field Guide: How Hunters Actually Use Them
Most hunters buy a thermal monocular and immediately wonder why they didn’t buy one sooner. Then they spend the next six months figuring out how to actually use it. The gear is intuitive. The technique takes longer.
This isn’t a buying guide. If you want to know which monocular to buy or what to get under $1,000, those pages exist — start with our thermal monoculars buyers guide. This is about what happens after you unbox it and head into the field.
The Role of a Monocular in Your Setup
Your rifle-mounted thermal scope is a shooter. It’s designed to put the reticle on an animal and break a shot. That’s its whole job.
The monocular does everything else. It scouts. It identifies. It gives you situational awareness across the whole field, not just the lane your barrel is pointing at. Hunters who treat the monocular as a complement to their scope — not a replacement — get the most out of both tools.
The key shift in mindset: stop raising your rifle to scan. That’s the habit thermal monoculars break. You glass with your hands, you identify the target, you understand what’s in the field around you — and only then do you raise the gun. Every experienced night hunter who makes this transition says the same thing: they had no idea how blind they were before.
How to Scan a Field Effectively
The instinct is to scan fast — sweep the field like you’re using binoculars, covering ground. Resist that. Thermal monoculars reward patience.
Work in grids. Pick a section of the field, hold on it for three to five seconds, then move. Heat signatures appear as you pause, not as you pan. A coyote standing still in grass at 300 yards will look like nothing when you’re sweeping through. Hold on that section and the heat blooms up.
Start at maximum range and work in. Identify everything at distance first, then examine closer targets. This tells you the full picture of what’s in the field before you focus on one animal and miss the one at 80 yards to your left.
Magnification: use the lowest setting for initial scans. High magnification narrows your field of view and makes you miss movement on the edges. Once you have a target located, zoom in for identification. Two passes — wide for detection, narrow for ID.
Hog Stand Setup
A hog stand is where the monocular earns its keep the most. You’re typically sitting over a feeder or food source, waiting on a sounder to show up. The problem with relying only on a rifle scope is that hogs stage — they stop 200 yards back and mill around before committing to the feeder. You won’t see that with your scope unless you’re raising the rifle every ten minutes.
Set up with the monocular in hand from the time you’re on stand. Scan the treeline at 200-300 yards every few minutes. Hogs staging show up as scattered heat blobs that move slowly and erratically. That’s your signal — they’re on their way in.
Knowing they’re staging gives you time to get ready. You can settle into position, get your rifle up, pick your shot. The alternative — hearing them before you see them and scrambling in the dark — is how you rush shots and wound animals.
Also check the downwind approach. Hogs often circle before committing. The monocular lets you track where the sounder is coming from and adjust your position before they get close enough to wind you.
Coyote Calling with a Monocular
Coyote calling at night is where thermal monoculars give predator hunters a serious edge over a rifle-only thermal setup. You’re calling, running the e-caller, watching for responses — you need your hands and your eyes free. Raising a rifle to scan every minute blows the setup.
The monocular on a tripod is the solution. Set it up on a small tripod aimed at the most likely approach — usually downwind of the caller, 150-250 yards out. You watch the monocular, hands on the rifle, ready. When a coyote appears in the field of view, you know exactly where it is. You raise the rifle, find it with the scope, and shoot.
Two things to know about coyotes in thermal: they run warm but they’re small. At 300 yards, a coyote is a compact heat signature — nothing like the broad blob of a hog. They also tend to stop and look before committing, which gives you a shooting window. Watch for the pause. That’s your shot.
In cold weather — January, February — coyotes against frozen ground are easy to pick up. The contrast is high. Warm nights in summer are harder; the ground holds heat and coyotes blend more. Adjust your detection distance expectations accordingly.
Deer Scouting
Thermal monoculars are legal for scouting in most states — check your regulations, because some states restrict thermal for active hunting during deer season. For scouting applications, though, the monocular is one of the most useful tools in your kit.
Pre-season scouting with thermal changes what you can do from a truck. Drive field edges at dusk, glass with the monocular through the window. You’ll see deer movement patterns — where they enter fields, where they stage in the timber before coming out, which travel corridors they use. This takes hours of boot-time observation in daylight and condenses it into a single evening drive.
Post-shot recovery is the other application most hunters don’t think about until they need it. A hit deer that runs 100 yards into thick brush is hard to find in the dark with a flashlight. A thermal monocular picks up body heat for 20-30 minutes after death, making recovery faster and reducing the chance of losing an animal.
Integrating the Monocular with Your Rifle Scope
The practical workflow in the field: monocular detects and identifies, scope shoots. But there’s a coordination skill involved — translating what you see in the monocular to what your scope shows you.
Reference points help. Before dark, identify landmarks at known distances: a fence post at 150 yards, a brush pile at 250. When you spot an animal with the monocular, note which landmark it’s near. That gives your scope something to find in the dark field.
Matching magnification matters too. If you’re running a 384-class scope and a 384-class monocular, the image quality is similar enough that transitioning between them doesn’t create confusion. If your monocular resolution is lower than your scope, you’ll occasionally identify something as “probably a hog” in the monocular and confirm it instantly through the scope. That’s fine — the workflow still holds.
For two-person setups, a monocular with a built-in laser rangefinder adds another layer. The spotter ranges the target and calls the distance to the shooter, who dials or holds accordingly. Experienced predator and hog crews run this setup regularly — spotter with monocular handles everything up to the shot, shooter stays focused on execution.
Terrain-Specific Tips
South Texas brush country: Tight shots, heavy cover. Thermal reads through brush better than any other technology — you’ll see body heat behind mesquite that would be invisible to traditional NV. Work field edges and senderos. Detection distances are shorter by nature of the terrain, so a 256-class monocular handles the distances you’ll actually be shooting.
Open pasture/farmland: Long detection distances matter here. Animals stage far back, you have more time to observe and plan. Higher resolution pays off when you’re trying to count points on a buck at 400 yards or identify whether that heat blob is a hog or a cow. The extra glass is worth it in open country.
River bottoms and hardwood timber: Dense canopy blocks some ambient light, which reduces passive NV performance significantly. Thermal is unaffected by overhead cover — it reads body heat regardless. Shots in this terrain are typically close, under 100 yards. The challenge is tracking animals through heavy vegetation after the shot. The monocular helps with recovery.
Cold weather hunting: Thermal contrast is highest in cold. Animals stand out sharply against frozen ground. Battery performance drops — keep the monocular inside your jacket between scans in extreme cold, especially below 20 degrees Fahrenheit. Most quality monoculars spec to about -13F, but battery life falls off well before the display does.
Common Mistakes
Overusing magnification. New thermal users zoom in immediately on everything. The problem is that high magnification on a thermal monocular degrades image quality noticeably. Find the target at lower power, confirm it, then zoom only as needed for identification — not for detection.
Ignoring the edges of the field of view. Coyotes and deer often approach from the sides of your scan area, not straight ahead. Build edge-checking into your scan pattern.
Not accounting for heat bloom in warm weather. Rocks, vehicle hoods, dark asphalt — these hold heat and can look like animals on a warm night. Know the terrain before dark. Walk the area and note where obstacles are so you don’t spend twenty minutes watching a warm rock.
Forgetting about resolution’s effect on identification distance. A 256×192 sensor spots a coyote at 400 yards. It won’t tell you if that 400-yard animal is a coyote or a large house cat. If positive ID at distance matters for your hunting situation, that’s the real argument for stepping up in resolution — not detection range.
For guidance on which monocular fits your budget and use case, the thermal monoculars buyers guide covers the full lineup. Hunters focused on staying under $1,000 should also read our best thermal monocular under $1,000 breakdown before buying.
The Actual Skill Gap
The thermal monocular doesn’t make you a better hunter automatically. It gives you more information. What you do with that information — how you read animal behavior, how you position yourself, how you coordinate the monocular with your rifle — that’s the skill.
Hunters who get the most out of thermal observation are the ones who slow down and use the information advantage. You know the hog is staging at 280 yards before it commits to the feeder. That’s two minutes to get into position, settle your breathing, pick the right animal. Use that time. The technology hands it to you.
The hunters who don’t get much out of a thermal monocular are the ones who keep hunting the same way they did before and just added a gadget. The tool changes what’s possible. The technique is what changes what actually happens.
Related reading:
Can You Use a Thermal Scope During the Day? Daylight Use/Sun Safety and Zeroing Tips.
Night Vision Range Explained: Detection, Recognition, Identification, and Real Hunting Distance
How to Set Up an IR Illuminator for Night Vision: Placement, Beam Width, and Field Mistakes