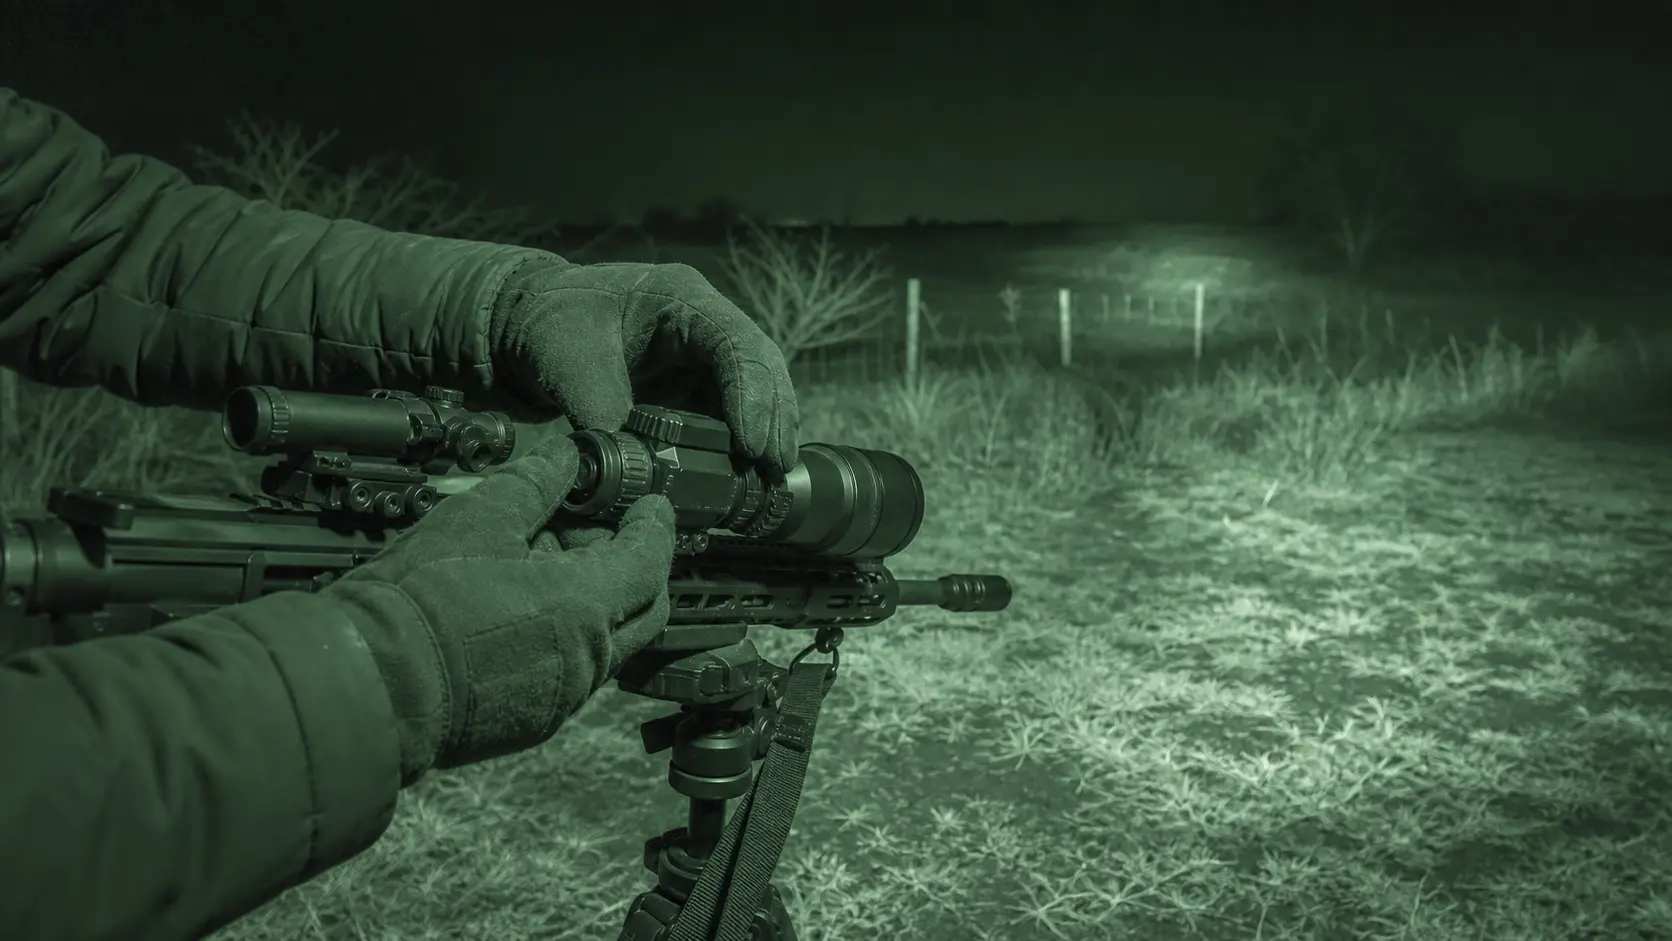
How to Set Up an IR Illuminator for Night Vision: Placement, Beam Width, and Field Mistakes
This article explains how to set up an IR illuminator for night vision, including placement, beam width and field errors.
While an IR illuminator can enhance a night vision image and make it easier to use, it can only do so if it is controlled. Many hunters purchase a more powerful light and install it on the rifle, turn it to full power and are amazed that the image is washed out, bright, or looks like a narrow tunnel.
The field rule is easy: use the lowest IR power that will provide adequate detail, center the beam in the direction the night vision device is pointed, and field test the combination from a real hunting position prior to the hunt. This guide teaches you how to use IR illuminator with night vision on rifle mounted and helmet mounted setups, PVS-14, digital, and clip-on without any unnecessary issues. It also provides a step-by-step guide to night vision hunting setup, rather than merely an accessory.
Always consult local and state regulations prior to hunting with any IR light. Artificial, infrared, weapon mounted lights, public and private land and species rules may vary. Keep the tech straight as well; thermal scopes don’t need IR illumination to create an image. Thermal is detecting heat differences, night vision requires light.
The three IR illuminator setup tips for setting up a beam are: Start Low, Match the Beam to the Terrain, and Test Before the Hunt.
A bright IR illuminator setting is not the best. Start with:
- Low power
- Wide beam
- Night vision device with beam through the middle
- No barrel, suppressor, scope body, rail, truck, blind, fence or nearby brush reflections
- Flood for close work and scanning
- Spot for longer open areas
- Before hunting, get the legal OK
If the image worsens when the illuminator is turned on, reduce the power, angle and/or beam width and search for reflective objects. Night vision image washout and night vision IR glare typically are set up issues.
Please refer to USA Night Vision’s Best IR Illuminators for Night Vision in 2026 for product selection. This article is concerned with placement and field use, once you are already equipped with an illuminator.
This is what an IR Illuminator actually does.
The IR illuminator is simply a flashlight that can be utilized by your night vision gadget. It emits infrared radiation into the scene, with the device forming a brighter image from the infrared radiation that reflects off the scene. It is of assistance in no-moon situations, heavy cloud, dark timber, barns, shaded fields and long distance identification.
It can also yield a worse image. Excessive IR close up can cause a loss of detail. Light can be reflected back into the device from wet leaves, wire fences, vehicle glass, suppressors, fog, dust, rain and snow.
Analog Night Vision vs Digital Night Vision
Analog night vision takes in the existing light and magnifies it by the aid of an image intensifier tube. A PVS-14 type monocular might require very little IR in good moon or starlight, but additional IR might be helpful when operating under canopy or in deep shade. When using a unit with manual gain, set for detail rather than raw brightness, and always use the manufacturer’s recommendations for bright-light exposure and daylight protection.
Digital night vision is an electronic sensor and display. A large number of digital scopes rely more on IR, particularly for identification at hunting ranges. A digital night vision IR illuminator that isn’t strong enough, aligned correctly or wide enough can make the entire system feel weak.
Another layer with clip-on night vision is that it is attached to the front of a day optic. The beam should support what the day optic and clip-on are seeing together. Refer to the post about how to run clip-on night vision on existing rifle scope for that setup.
To Select a Starting Position
Night vision IR illuminator placement depends on the use of the device in the darkness of the night.
Rifle-Mounted IR
The standard night vision rifle combo is a rifle mounted IR illuminator. It gives direction with the rifle, and allows for switch placement where the support hand can reach it.
Set-up with the weapon unloaded and safe. Do not attach or tune lights to a loaded rifle. Ensure that the mount is snug, the switch operates with gloves, the cable does not catch, and the bezel is not obstructed by the handguard, barrel, front sight, suppressor, sling or bipod.
If the light is placed too far aft, it can cast a shadow of the barrel or suppressor. A light that is too low will bounce off a bipod, rail or blind edge. Before calling it good, try out the actual view.
Helmet-Mounted or Handheld IR
A helmet mounted IR illuminator is a good choice for PVS-14 use as the illuminator will travel with your head. That’s helpful when walking, when you’re scanning close to cover, when you’re reading terrain or when you’re handling your gear. The problem with this is that every head movement can sweep IR across brush, reflective signs, windows, or other hunters’ night vision devices.
Handheld IR is versatile, but requires one hand. It is more suitable for scans and set up checks than a shot sequence where rifle control is a factor. For the whole-system description, begin by reading the night vision setup for beginners description.
Mounting Offsets and Shadow Problems
The offset mount allows the illuminator to be moved away from a suppressor or sight, but can also cause the beam to not line up at close range. Dry test on a safe berm or edge of a field. When one side of the image appears dark or crescent shaped, check for the barrel, suppressor, handguard, sight or accessory shadow.
Flood vs Spot Beam Width
IR illuminator flood vs spot control is important. A wide flood beam provides perspective. A tight spot beam provides reach.
Flood for Close Range / Scanning
Flood is a better starting point for walking, brush, timber, barns, feeder areas and close range identification. Rather than one small bright circle it features the animal, the ground, the fence and the surrounding cover.
Splashback is a risk. At high power, a wide beam may bounce off wet grass, nearby vegetation, car windows, blind perimeters, feeder stands, and fence wire.
Use Spot for Distance
Use Spot across open pasture, long fields and field edges where more light is needed over a smaller area.
Spot beam is not for all occasions. A narrow IR illuminator beam width results in tunnel vision as coyotes cross a field or as hogs move in and out of cover. Adjustable beam divergence is sometimes more useful than maximum claimed output.
When Adjusting Power Settings, the Lowest Useful Power Setting Is Usually the Winner
Typically, the best IR illuminator settings are pretty mundane: low enough for detail, high enough to illuminate the area of interest, and adjusted according to distance.
Start low. Fill with only the necessary amount. Stop once the image has enough detail for you to use.
Too much IR causes night vision image washout. The picture can appear flat, hazy, very bright, or low in contrast. Reflective objects can be blooming. The outline you need is the one you lose, rather than getting more animal detail.
Some of the typical reflection points are:
- Soggy grass and leaves
- Fence wire and metal gates
- Scope bodies and objective bells
- Suppressors and muzzle devices
- Feeder legs and metal posts
- Vehicle glass and mirrors
- Dust, fog, rain, snow
- Blind windows and shooting ports
Never evaluate the set-up at the bench! Test standing, sitting, with sticks, on a tripod and in a blind (if you hunt in a blind).
850nm vs 940nm in Real Use
The decision between 850nm vs 940nm IR illuminator is a compromise.
850nm: More Reach, More Visible Glow
Many night vision devices will produce a brighter image and have a better practical range with an 850nm illuminator. The downside is the emitter may have a slight red glow from the front.
Do not make definite statements about animals and IR. Different conditions, pressure, angle and distance. The safe field answer is that 850nm typically would be for performance, but may be more apparent on the emitter.
940nm: Less Visible Glow, Less Range
A 940nm illuminator will normally decrease the amount of visible emitter glow, which could be an issue in some close range or wary-animal scenarios. Typically, the compromise is reduced range and/or image brightness for the device.
An 850nm is the best initial choice for most hunters when identification distance and brightness of the image is paramount. Try 940nm where there is more need for reduction of visible emitter glow than reach, and test it with the real optic. Beam control and power management can be more important than wavelength for an IR illuminator for hog hunting in mixed cover.
Device Type Matters
If an IR illuminator for PVS-14 is used, it should be considered as supplemental light. When it is sufficient, use the ambient light, when the image needs help, add the IR and when it is not needed, do not use bright exposure.
The IR illuminator for night vision scope applications is frequently the key component to the entire system, particularly in digital scopes. If the image is not clear or is dark and grainy, check focus, battery, wavelength, beam alignment and power before condemning the optic. Refer to the best night vision scope for coyote hunting guide for examples of some predators.
With a clip-on night vision you have to properly align with the day optic. Zero in the beam through the combined view, not from the rifle. Look for light reflect off scope objective, rail and suppressor.
Thermal scopes are not included. Thermal does not use reflected infrared light to create a thermal image so IR illumination will not help brighten the image.
Field Setup Procedure
Before You Go Hunting, Verify the Law and Hunting Area
Review artificial light hunting laws, IR rules, weapon-mounted light rules, public-land rules, private-land permissions and species rules. The night vision hunting guide will be helpful, but check with local authorities before hunting.
Place the Illuminator Safely in the Mount
Unload the gun and check the safety and then attach the illuminator securely. Check that the beam is not obstructed by any gear or the switch is accessible.
Begin at LOW POWER
Be sure to use low power and a wide beam initially. Use the night vision device and only amplify the picture to the point where the area of interest has sufficient detail.
Center the Beam Through the Device
Never do IR by naked-eye guesswork. Align it from the positions you use it at through the night vision device.
Step 5: Test Real Distances
Check close brush, 50-100 yards and the length of field edge you plan to hunt. For each distance, adjust beam width and power.
Step 6: Glare and Handling Problems
Sweep around objects and be aware of splashback. Test wearing hunting clothes and gloves. Ensure that cables, switches and slings have no snags.
There Are Some Frequent IR Illuminator Errors
Buying the Brightest Illuminator First
Easy to advertise maximum output. It’s the controlled output that helps in the field.
Running Too Much IR at Close Range
If you’re working in close range, you typically need less IR. When using full power in brush, barns or feeder areas the detail you are looking for can be lost.
Using a Spot Beam for Everything
A spot beam at a distance is helpful but also limits awareness. Use flood when needed, and spot when needed.
Mounting Behind Obstructions
Barrels, suppressors, front sights, handguards, bipods, and rail accessories can cause shadows or reflect. If the beam is not even, first check the physical setup.
Forgetting Batteries
Batteries may have decreased performance during cold weather. Keep warm and accessible spares.
If It’s Invisible, It’s Legal, Right?
Just because you can’t see it doesn’t mean it’s free! There are some rules that act as artificial light for IR. Always check the law prior to hunting.
Treating Laser IR as a Flashlight
Invisible IR laser radiation may be dangerous. Observe manufacturer guidelines, heed device warnings, and do not point IR lasers at reflective surfaces, aircraft, vehicles or persons.
The Image Will Give You Clues About What Is Going On
Too Dark Image
Inspect focus, batteries, ambient light, gain (if applicable), beam alignment and wavelength. Add IR gradually.
The Image Is Washed Out
Reduce power, increase beam width, adjust angle and eliminate nearby reflections. During fog/dust/rain/snow — More IR can make the image worse.
Beam Appears Like Tunnel
Widen the beam or decrease power. Spot is likely being overused for the terrain.
All Animals Vanish When They Move
The beam could be too narrow, scanning technique might be failing, or there may be some near reflections that would be obscuring the movement. Use more flood and scan ahead of the animal.
It Is a Grainy Picture
The sources of grain may be low light levels, weak IR, poor focus, dirty lenses, device limitations or battery problems. If the basic checks don’t help, check against this night vision troubleshooting guide.
Practical Night-Hunt Checklist
- Land rules and law checked
- Device focused
- NV battery fresh for night vision use.
- Illuminator battery fresh
- Warm, easily accessible spare batteries carried
- Illuminator mounted securely
- Switch reachable with gloves
- Minimum useful power chosen
- Terrain matched beam width
- No barrels, suppressors, rails or front sight shadows
- No reflection from other equipment, blind, window, vehicle or brush
- Tested field set up
- Laser safety understood (if using laser devices)
Final Recommendation
A good IR setup is controlled, it is not just powerful. Position the light where the device is aimed, adjust the beam width to the landscape, start on the lowest useful power set and eliminate reflection issues prior to the hunt.
That is, for most hunters, the flood and low power used for close cover, the narrowed beam for long distances, thorough testing from the actual point of view and a legal check each time the hunting area, species, or state changes. The same basic logic is true when you are setting up an IR illuminator for coyote hunting in the open fields, or a shorter hog setup in the brush and feeders.
Can You Use a Thermal Scope During the Day? Daylight Use/Sun Safety and Zeroing Tips.
Night Vision Range Explained: Detection, Recognition, Identification, and Real Hunting Distance

Thermal Scope Pre-Hunt Checklist: Batteries, Zero, Settings, Mounts, and Weather Checks