Night Vision Setup for Beginners: Helmet, Mount, J-Arm, IR, and Zeroing Checklist
Buying the device is easy. Building an effective setup, on the other hand, can be a lot trickier.
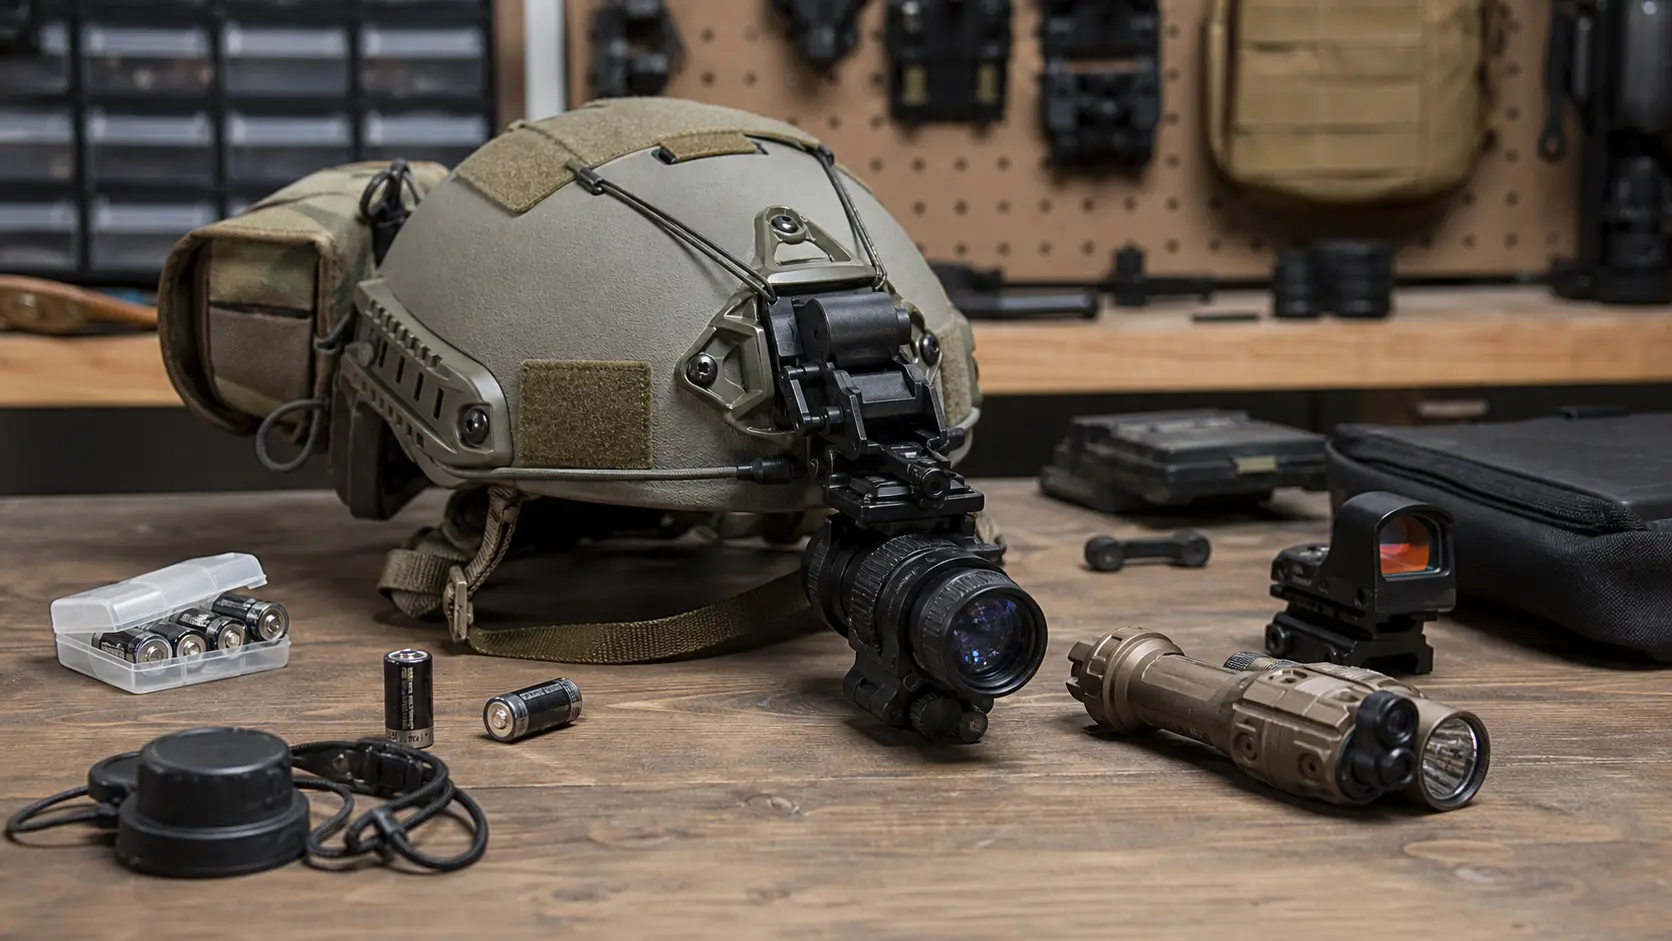
A standard beginner night vision setup typically consists of a PVS-14 or similar monocular, a bump helmet or ball cap, a proper shroud, helmet mount, PVS-14 arm/J-arm, IR illumination, and a way to aim through the tube.
None of the above is particularly complex individually. It is the combination that causes the most trouble for beginners when the helmet does not stabilize the device, when the monocular is placed at a distance, when the IR washes everything out, or when the optics blooming obscures the aiming point.
This is how beginners can avoid wasting money on a useless night vision kit.
Source reliability check
Below we compare and compile multiple sources before summarizing them as a beginner checklist.
| Source | Reliability | Best use | Limitation |
|---|---|---|---|
| PVS-14 user manuals | Very high | Device control, focus, diopter, helmet mounting, internal IR limitations | Technical manual language |
| Team Wendy EXFIL LTP documentation | Very high | Helmet platform, retention, rails, shroud, requirement for NVG interface | Manufacturer source, specific helmet |
| Noisefighters AX14-PRO product data | High | PVS-14 arm/J-arm design, dovetail requirement, rigidity claims | Product-specific |
| SureFire M640V product data | High | White light/IR light output and rail compatibility | Premium product information, not a universal recommendation |
| Streamlight TLR-VIR II product data | High | Flood light, IR illuminator, IR laser, runtime, rail use | Compact light best for close-to-medium range use, no long range IR |
| Holosun LS321R product data | High | Visible laser, IR laser, IR illuminator, Picatinny mount, CR123 battery | Laser/illumination performance varies by use |
| EOTECH and Aimpoint night vision optic data | High | Passive aiming and night-vision compatibility settings | Optic-specific |
| FDA laser info | Very high | Laser labeling, invisible infrared radiation, safety caution | Regulatory safety information, not a shooting guide |
All reliable sources agree on one key point. A good night vision setup is a system. The helmet needs to support the night vision, the mount and J-arm must position the device correctly, the IR illuminator must be adjusted for the current conditions, and the aiming device needs to be zeroed and confirmed prior to use.
Quick answer
A beginner helmet-mounted night vision system should include:
- PVS-14 or similar monocular
- bump helmet with proper NVG shroud
- retention mechanism
- compatible helmet mount
- PVS-14 arm/J-arm
- retention cord or lanyard
- counterweight or rear battery pack if necessary
- low power “admin” light
- IR illuminator
- night vision compatible red dot or holographic sight, or properly zeroed IR aiming device
- spare batteries
- legality check before hunting or firearm use
The most common beginner mistake is to assume that a night vision tube equals night vision. The mounting and support components make or break a functional setup.
Step 1: Start with the monocular
For most beginners, starting with the monocular is a better idea than going straight for dual tubes.
A PVS-14 can be held by hand, mounted on a helmet, or used behind suitable optics. It is versatile, common, and there is a wide array of accessories for the device. That is an important point because beginner problems are easier to solve in the existing ecosystem of proven accessories.
If you choose to buy second-hand, make sure to double-check tube specifications, look for any potential issues, and confirm the housing and lens condition. No helmet stabilization will save you from a subpar tube, a flawed objective lens, or some mysterious device.
Internal useful links:
- PVS-14 Night Vision: Complete Guide
- Used Night Vision Buying Guide 2026
- Night Vision Tube Specs Explained
Step 2: Get the right helmet
For most beginners, the bump helmet is more appropriate than a ballistic one.
The bump helmet is a stable platform to support accessories such as night vision, lighting, hearing protection, and communication gear. While the ballistic helmet can provide ballistic protection, it will be heavier, more expensive, and bulkier. In most scenarios, the bump helmet provides enough protection while remaining more comfortable.
Look for the following features:
- Proper NVG shroud
- Good retention mechanism
- Comfortable padding
- Accessory rails
- Correct size
- Enough stability for proper positioning of the monocular
- Space for hearing protection and communication equipment
Team Wendy’s documentation for the EXFIL LTP highlights an important consideration for beginner buyers: while the helmet can have a pre-installed shroud and rails, the NVG mount is usually purchased separately. Another common misconception among first-time buyers.
Do not confuse NVG helmets. Proper shroud, retention mechanism, and fit are more important than looks.
Step 3: Get to know the mount stack
A helmet-mounted PVS-14 system typically consists of the following connection points:
- Shroud attached to the helmet
- Compatible flip-up mount
- Arm for monocular
The PVS-14 can attach directly to the mount. It can also be placed on an articulating arm that can be moved up or down depending on user preference.
Compatibility can come into play when choosing mounts and arms. While some mounts use a bayonet interface, other mounts use a dovetail interface for mounting PVS-14. A modern tendency in night vision is preferring dovetail interfaces that are generally perceived to be sturdier and more reliable than bayonet. Still, the exact type depends on your particular helmet and monocular.
A standard J-arm can work fine. An articulating PVS-14 arm can make the night vision experience significantly better, especially when reducing the wiggle and ensuring the monocular sits where your eye naturally requires it to be placed. For instance, Noisefighters notes that its AX14-PRO PVS-14 arm is a dovetail interface compatible mount requiring less rear weight and boasting increased rigidity compared to a milspec J-arm.
Beginner tip: buy helmet mount and arm as a compatible stack.
Step 4: Set eye position before adding accessories
Before mounting a variety of accessories to your setup, set proper eye placement.
Adjust:
- helmet tightness
- vertical positioning
- fore/aft distance
- left/right positioning
- tilt
- diopter
- objective focus
- interpupillary distance for dual devices
In the case of PVS-14 manuals follow the same general guidelines: the diopter needs to be adjusted to ensure the clearest view of the intensifier screen. Afterwards, you adjust the objective lens focusing the device on the observed object. That means that before pointing at someone and screaming that your tube is defective, make sure the device is simply misaligned.
The monocular needs to stay in the natural eye position without forcing you to shift your neck or cheeks.
Step 5: Add retention and counterweight
Use lanyard or retention cord. A night vision device is expensive, and losing it off the mount is an expensive way to learn your lesson.
Counterweight is not mandatory for everyone. However, many PVS-14 users opt for a counterweight because it helps to balance the weight of the front device to minimize helmet weight on the wearer’s forehead.
Some possible options for counterweights:
- Rear counterweight pouch
- Spare battery pouch
- Weighted insert
- Rear battery pack if your device supports it
Start with light weight until your helmet is stabilized.
Step 6: Pick an IR illuminator
Any night vision needs light. Even analog tubes amplify the existing light sources, and digital night vision requires IR light even more often. Woods, heavy clouds, no-moon nights, or shaded environments can all require IR illumination.
However, excessive IR can be a problem. High-level IR illuminators can wash out the picture, cause glare, or reflect off of the environment and interfere with the view of the target.
For beginners:
- Use the lowest power setting of IR illuminator that provides a clear image of the target
- Prefer adjustable IR if possible
- Use IR flood at close distances
- Consider narrow IR beams for distance aiming
- Do not forget that thermal scope needs no illumination
- Check hunting/artificial light/IR laws before using IR for nighttime hunting
A compact IR illuminator, such as Streamlight TLR-VIR II, provides white light, IR illuminator, and IR laser in one compact rail mount. A rifle light, such as SureFire M640V, offers both white and IR illuminator. An IR laser/illumination module, such as Holosun LS321R, is capable of emitting white light, IR laser, and IR illuminator.
There are no inherently “better” or “worse” solutions for night vision lighting as it depends on your individual situation. It can be a helmet light, handheld light, or rifle-mounted illuminator.
Read further:
Step 7: Decide which aiming solution to use
There are two main methods of aiming in night vision: passive and active.
| Method | Definition | Best for | Limitation |
|---|---|---|---|
| Passive | Use of night-vision compatible red dot/holographic sights | Lower artificial light/IR signature, simple rifle setup | Requires NV-compatible optic with proper brightness setting and training |
| Active | Use of IR laser visible via night vision | Faster aim under NV | Laser/illuminator signature can be detected by other NV wearers |
According to EOTECH, night vision compatible models offer specific brightness settings for NV. Aimpoint specifies similar details, emphasizing that NV compatible sights feature low NV brightness settings.
If the optic is too dim in NV, you will not be able to see it. Too bright, on the other hand, means that the sight may be blurred and blooming on the intensifier screen.
Step 8: Zeroing checklist
If possible, zero in daylight conditions, then verify night zeroing in darkness.
For a typical beginner rifle setup:
- Ensure the rifle is not loaded.
- Mount and install optic, IR illuminator, light, and switches.
- Torque the optic according to the manufacturer recommendations.
- Zero in daylight conditions.
- Make sure that the NV device is positioned and focused.
- If using NV-compatible red dot, select a proper brightness setting.
- Ensure that sight does not bloom on the intensifier screen.
- If IR laser, zero accurately according to the manufacturer recommendations.
- Verify point of impact at intended ranges.
- Check that pressure switches are not triggered accidentally.
- Verify that IR illumination and white light cannot be accidentally activated in stressful situations.
- Double-check that all screw-on elements remain tight after live fire testing.
Do not neglect the last step. Night vision accessories bring new potential for loosening due to additional weight and shock forces.
Step 9: Legality and safety checks
There are different laws governing the use of night vision for civilian purposes.
It is not the same thing to own night vision and use it to go hunting at night. While many jurisdictions allow the use of NV for observation, many prohibit or limit hunting with night vision in various ways. Restrictions can apply both to night hunting specifically, as well as using infrared or thermal devices. They can be specific to the species hunted, and even the type of land you hunt on.
Here are the laws you might want to consider in most cases:
- Hunting laws and regulations
- Night hunting rules for the specific species
- Rules governing artificial light hunting
- Rules governing the use of IR illumination
- Rules governing the use of night vision for hunting
- Rules governing use of thermal device for hunting
- Weapon-mounted light rules
- Land specific hunting rules (public vs private)
Additional caution needs to be applied to IR lasers. According to FDA laser guidelines, any laser product can emit invisible infrared radiation and require labeling and safety precautions. Special care is needed for IR devices since they can be harmful to health if directed at the eyes.
Never shine any laser including an IR one at a person, vehicle, aircraft, reflective surface, or any other unintended target.
Common beginner mistakes
- Buying monocular but not allocating funds for the mount
- Failing to tighten the helmet
- Buying incompatible mount parts
- Running too much IR illumination
- Not having backup batteries
- Assuming all red dots can be used with night vision
- Neglecting to check legality requirements
- Overlooking safety considerations for lasers
Conclusion
A beginner night vision setup should focus on stability, compatibility, and thorough preparation and testing.
First, get the right PVS-14 or comparable monocular. Mount it on a bump helmet with a proper shroud, helmet mount, and PVS-14 arm. Set the eye position before mounting other components. Run the right amount of IR for the current darkness level. Use passive or active aiming based on the optic capabilities, hunting environment, and legal requirements. Then test and verify the zeroing in daylight before trying in darkness.
Night vision is much more than the night vision device.
Can You Use a Thermal Scope During the Day? Daylight Use/Sun Safety and Zeroing Tips.
Night Vision Range Explained: Detection, Recognition, Identification, and Real Hunting Distance
How to Set Up an IR Illuminator for Night Vision: Placement, Beam Width, and Field Mistakes