Thermal Scope Pre-Hunt Checklist: Batteries, Zero, Settings, Mounts, and Weather Checks
Before you head out this preseason, here is a thermal scope battery, zero, setting, mount and weather checklist:
Thermal scope issues typically occur at night, at the truck, or when the hog or coyote is already in motion. Most of the time, it’s because of a weak battery, incorrect zero profile, bumped focus ring, loose mount or because the charging port has gotten wet, or an untested app feature.
This is a pre hunt thermal scope checklist that is a practical routine for any night hunter that wants to be prepared for the hunt with their thermal scope. It does not take the place of your scope manual. Model-specific battery, firmware, cleaning, waterproofing, and calibration should be done as per instructions provided in the manual. Always check the rifle is unloaded and handle the muzzle safely before checking any mounts, controls, batteries or lenses.
Learning how to use a thermal scope can be a lengthy process. There’s a lot to learn when it comes to using a thermal scope.
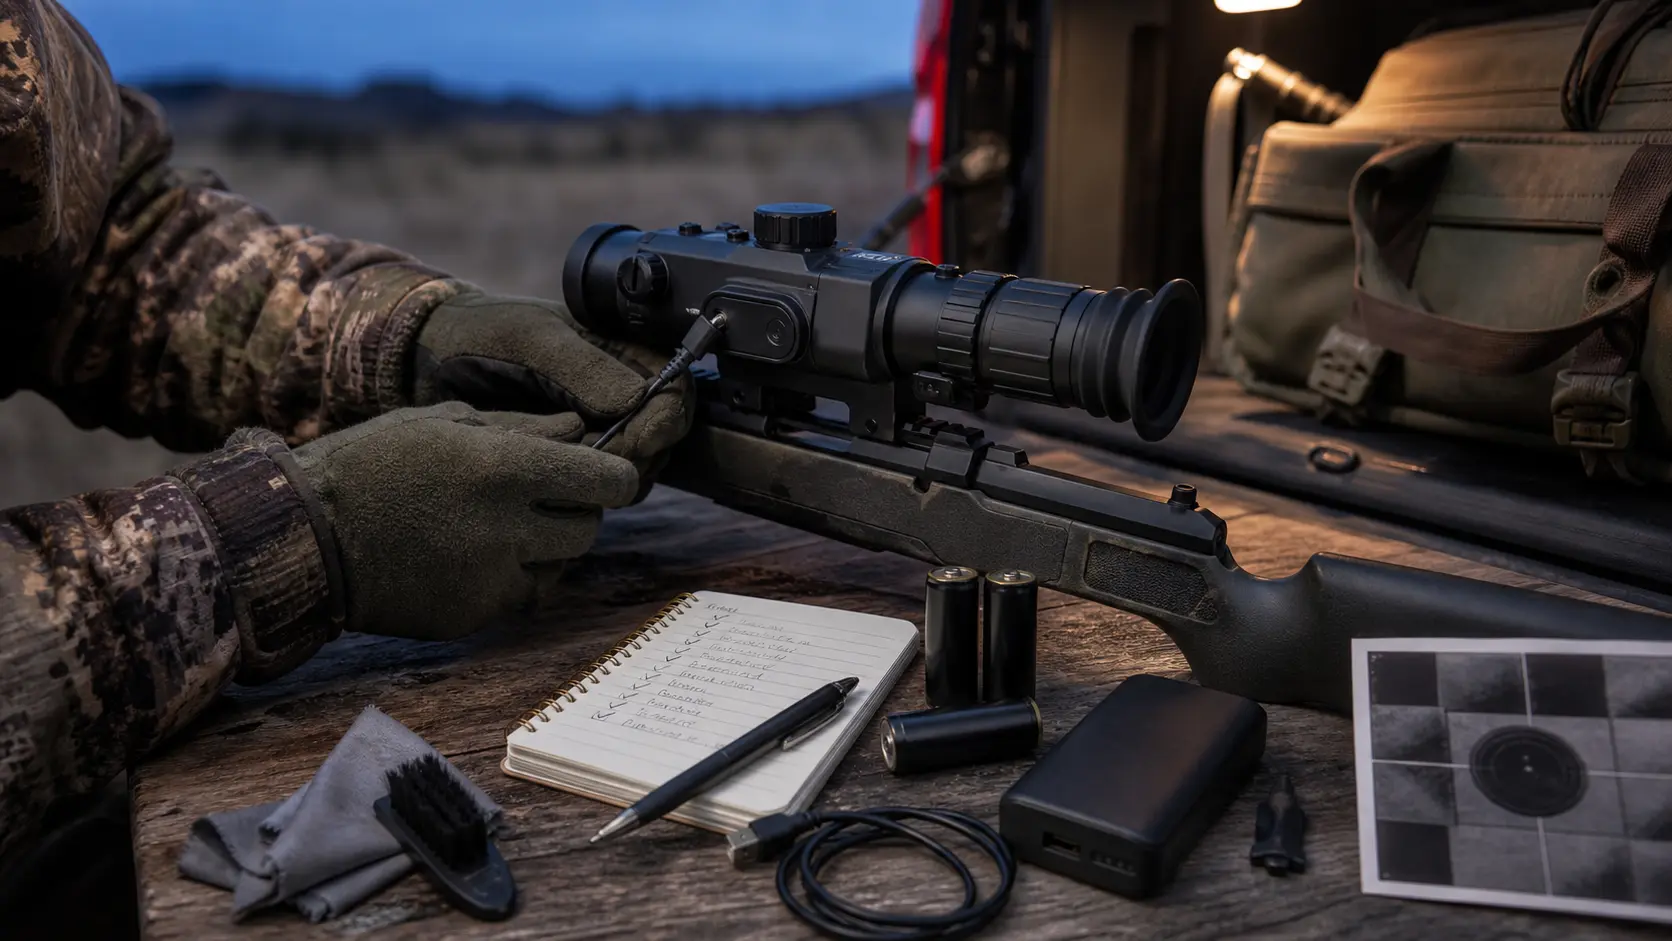
Recharge internal battery, replaceable batteries and any external power bank. Bring the appropriate cable, backup batteries, lens cloth, brush, mounting equipment, and thermal-visible target material. Check battery doors, rubber port covers, lens caps, focus rings, QD levers and battery cables.
- Check Wi-Fi, app connections, recording and saving before departure.
- Do not update the firmware immediately prior to a hunt if no time to test scope afterwards.
- Check the active thermal scope zero profile is set to the rifle, load, suppressor status and distance. Check point of impact following hard transport, mount change, firmware change or new ammunition lot.
- Use a thermal-visible target, rather than a "cold paper mark."
Check out USA Night Vision’s article on thermal scope reticle and zeroing explained 2026 and thermal scope losing zero or shifting POI.
- Turn on in time for the scope to settle.
- Adjust the eyepiece diopter to make the reticle and menus sharp. Pick a realistic hunting distance to focus on. Adjust NUC / FFC if the image appears flat, shaded or uneven. If the image looks weird, reset brightness/contrast, reset palette, reset sharpness.
- Only load if safe and legal to do. Make sure that the display is clear, the reticle is visible and the correct zero profile is active.
- Ensure that cables, tripod clamps, slings, gloves or clothing don’t impede controls or the safe use of a rifle.
Check the batteries and power plan.
Thermal scope battery life depends on temperature, display brightness, recording, WiFi, in standby mode and accessories. Make power planning a part of the hunt.
Batteries should be either internal or replaceable, or use an external power bank.
Power system up to your scope: Internal battery, replaceable batteries, or external thermal scope battery pack. Try the cable and pack you plan on using. If it’s not tight in the driveway, it’s not tight on a blind or tripod.
Read more details in the USA Night Vision thermal scope battery life guide 2026 and the external battery pack for thermal scope – usb c power guide.
Planning for cold weather runtimes and spare batteries.
Batteries can lose runtime in cold weather when not stored in a covered area. Store spares warm and dry and take more power than the minimum. If the scope wakes up quickly, standby mode helps, but only if the scope wakes quickly. Test before using. USA Night Vision has a guide on the thermal scope standby mode and startup time.
Cable Routing and Wet-Weather Power Risks.
Ensure that external power is routed in such a way that the cable doesn’t obstruct the focus ring, the bolt handle, the charging handle, the safety, the trigger guard, the tripod or the support hand. Rain: Do not expect an open USB-C port to be as weather-resistant as a closed cap.
Step 2: Check Zero, Zero Profile, Rifle, Ammo
The best set up for night hunting with a thermal scope begins with the right profile, and a confirmed point of impact.
Match the Correct Rifle / Ammo / Suppressor Profile.
Several thermal scopes have various profiles stored. Verify Profile Name / Number, Rifle, Ammunition and Suppressor BEFORE HUNT. This is a non-negotiable if one scope jumps between rifles.
Check after transport/firmware changes for confirmation of Point of Impact.
If the rifle has bounced around in a case, had a mount removed, changed ammo or had a firmware update, it should be checked with a thermal scope for zeros. Zero is a good indicator of whether mount tension, rail position, ammo, profile, suppressor change, or shooter position is causing the issue; if zero is not being maintained, rule them all out.
A Thermal-Visible Target (TVT) removes the guesswork!
Cold paper is frequently bad for thermal. Always use a safe thermal-visible aiming point that has been approved for your range setup.
Inspect Mount, Rail Slot, Torque, Cheek Weld.
Perform in an unloaded rifle. Check chamber clear before touching mount.
What to Check on AR-15 Platforms
On AR-15s, make sure the scope is in the proper rail, the QD lever or crossbolt is pushed and the optic hasn’t crept. Check charging handle and cable clearance. Shoulder the rifle from the following positions: standing, sticks, tripods, blind rail.
See how to mount a thermal scope and the thermal scope mount height cheek weld ar15 bolt rifle.
What to look for on Bolt Rifles:
On bolt rifle, inspect bolt throw, loading/ejection clearance, safety access and cheek weld. Traditional stocks may leave your eye low behind a higher thermal. If you’re using a cheek riser, ensure it’s fastened.
When a Mount Issue Looks Like a Scope Problem, it probably is.
Loose base, inconsistent QD lever, moving rail position or poor cheek weld can appear to be a scope failure. Follow mount and scope torque values and procedures.
Adjust Diopter, Focus, Palette, Contrast and Brightness.
When setting a thermal scope for hunting, it is important to begin with a known baseline.
Get the Eyepiece in Focus before Assessing Image Quality!
The sharpness of reticle and menu to your eyes is controlled by the diopter. Place it first before evaluating the image. Objective focus cannot correct blurry menu texts.
You need to adjust your focus to what you can realistically hunt.
The first thing to check is the thermal scope focus, at the distance you intend to hunt. If it still appears soft when it’s on diopter and in focus, consult USA Night Vision’s explanation of Why a Thermal Scope is Blurry.
Select White Hot, Black Hot or Highlight Mode according to conditions.
Weather is a factor, and a good starting point is white hot and black hot. Fog, humidity and warm nights can reduce contrast. Adjust brightness, contrast, palette and sharpness slightly. Read about thermal image settings.
Step 5: Run NUC / FFC and Watch for any image issues.
Thermal scope NUC also known as FFC is used to rectify the unevenness of images caused by temperature fluctuations.
When to Run Manual Calibration
Do manual NUC / FFC when image is shaded, uneven, flat, or unstable, or manual states to do so. USA Night Vision lays it out in its blog post on thermal scope NUC calibration.
Ghosting, Shading or Flat Contrast can mean:
Ghosting or flat contrast may be due to calibration, lens condition, settings, weather, or distance. Always check the reversible first: the lens, the focus, the NUC, the brightness, contrast and the palette and distance.
Weather limits are not the same as scope failure.
Range of identification can be decreased by fog, rain, wet vegetation and humid air. This is not the same as moisture inside, display failure or artifacts that will not clear. Check out thermal scope fog and humidity.
Step 6: Inspect weatherproofing, port covers and lens condition.
Thermal scope field care is primarily preventive.
Rain, Fog, Humidity, Dust and Wet Grass.
Inspect weather and terrain conditions. Light rain may be able to soak a rifle, but wet grass can do it much more quickly. Lenses and buttons can be covered by dust.
Check for damage to USB-C Ports, Battery Doors, and Rubber Caps.
Check all caps and doors prior to departure. A torn cover or half closed battery door is important in wet weather. Know your thermal scope’s waterproof rating, yet follow the instructions. Check thermal scope waterproof ratings: thermal scope waterproof ratings (IP67) – rain, cold weather.
Before a hunt, safe lens cleaning is paramount.
Avoid wiping of grit on a germanium objective lens. Use a brush or blower, followed by a clean cloth and approved method. If you are seeing moisture inside, STOP and call support.
Test the recording, Wi-Fi, Apps, LRF and Extra Feature Early
Extra features should not detract from safety, identification and shot.
Avoid discovering problems on stand:
Thermal scope app not connecting issues are not stand problems. Pair the phone and try out the feature you intend to use.
Confirm Storage, RAV and Video settings.
When recording, verify storage, date/time, file saving, and recoil-activated video behavior prior to departure. Have a look at thermal recording, Wi-Fi, apps and RAV.
Understand which features are optional for the hunt.
LRF, app streaming, recording and advanced color modes can assist, but not all are necessary. Choose what to concentrate on tonight and ignore the rest.
Make a simple night hunting support kit.
Bring spare batteries, power, the right power cable, lens cloth, brush, thermal-visible target material and the exact tools you use on your mount. Store larger tools, additional targets and backup cables in the truck. Only bring the items to the field that are necessary such as the battery, cloth, brush, and essential cable. Do not change major zeros, firmware, profiles or mounts while hunting unless it is safe to do so and has been tested. Field adjustments should remain reversible: focus, NUC, palette, brightness and contrast.
Here are several common pre-hunt mistakes to avoid making.
Leaving the Wrong Zero Profile Active
Double check the profile to be sure that it is active before loading the rifle for the hunt.
Assuming Standby Mode Saves Enough Battery.
Standby will only help if the scope does wake up quickly and has enough power.
Updating Firmware Right Before a Hunt.
Firmware for the thermal scope may alter menus, application functionality, settings or profiles. Never update immediately prior to a hunt unless required by support or manual and you can test afterwards. Check out thermal scope firmware updates.
Using External Power in Rain Without Checking the Manual.
Wet weather and open charging ports do not mix, unless the manual states otherwise.
Blaming the scope before focusing, mounting and settings are checked.
Typically, battery, focus, diopter, NUC, lens condition, mount and profile are the first areas to check when troubleshooting with a thermal scope. If this checklist doesn’t resolve it, use the thermal scope troubleshooting guide.
This is when to stop troubleshooting and reach out to a support team.
Water Inside the Optic
Moisture on the outside is common. Field fix to moisture in the optic is not possible.
Burning Smell, Bulging Battery or Damaged Port.
If the battery is swollen, the charging port is damaged, the device is overheating, or there is a smell of burning, discontinue use.
A repeated Zero Shift occurs after Rifle and Mount variables are ruled out.
Repeat the test and report to support if rifle, ammunition, mount, rail, profile and shooter variables are unchanged and zero still moves.
Image artifacts after running the Correct NUC / FFC.
Artefacts or "dead spots" not corrected by NUC / FFC or display faults / focus failures after NUC / FFC and settings checks have been performed may indicate service is required.
Final Field Checklist
10-Minute At-Home Checklist
- When inspecting the rifle be sure that it is unloaded.
- Charge scope, batteries, and external pack.
- Check for lens, caps, mount, cable and port covers.
- Test app, Wi-Fi, recording, storage and accessories.
- Pack batteries, cable, cloth, brush, target material and tools.
5-Minute Truck Checklist
- Power on early.
- Check battery level / zero Profile.
- Adjust diopter, focus, brightness, contrast, and palette.
- Perform NUC / FFC if necessary.
- Inspect mounting position, cable routing and access to controls with gloves.
60-Second Before-the-Stand Checklist
- Ensure safe condition of firearm for the time you are in.
- Test for display clarity, visibility of reticle and target identification conditions.
- Re-check focus and NUC again.
- Ensure there is nothing interfering with the safety, bolt, charging handle, trigger guard or tripod movement.
- Do not change the major settings unless circumstances dictate otherwise.
Can You Use a Thermal Scope During the Day? Daylight Use/Sun Safety and Zeroing Tips.
Night Vision Range Explained: Detection, Recognition, Identification, and Real Hunting Distance
How to Set Up an IR Illuminator for Night Vision: Placement, Beam Width, and Field Mistakes