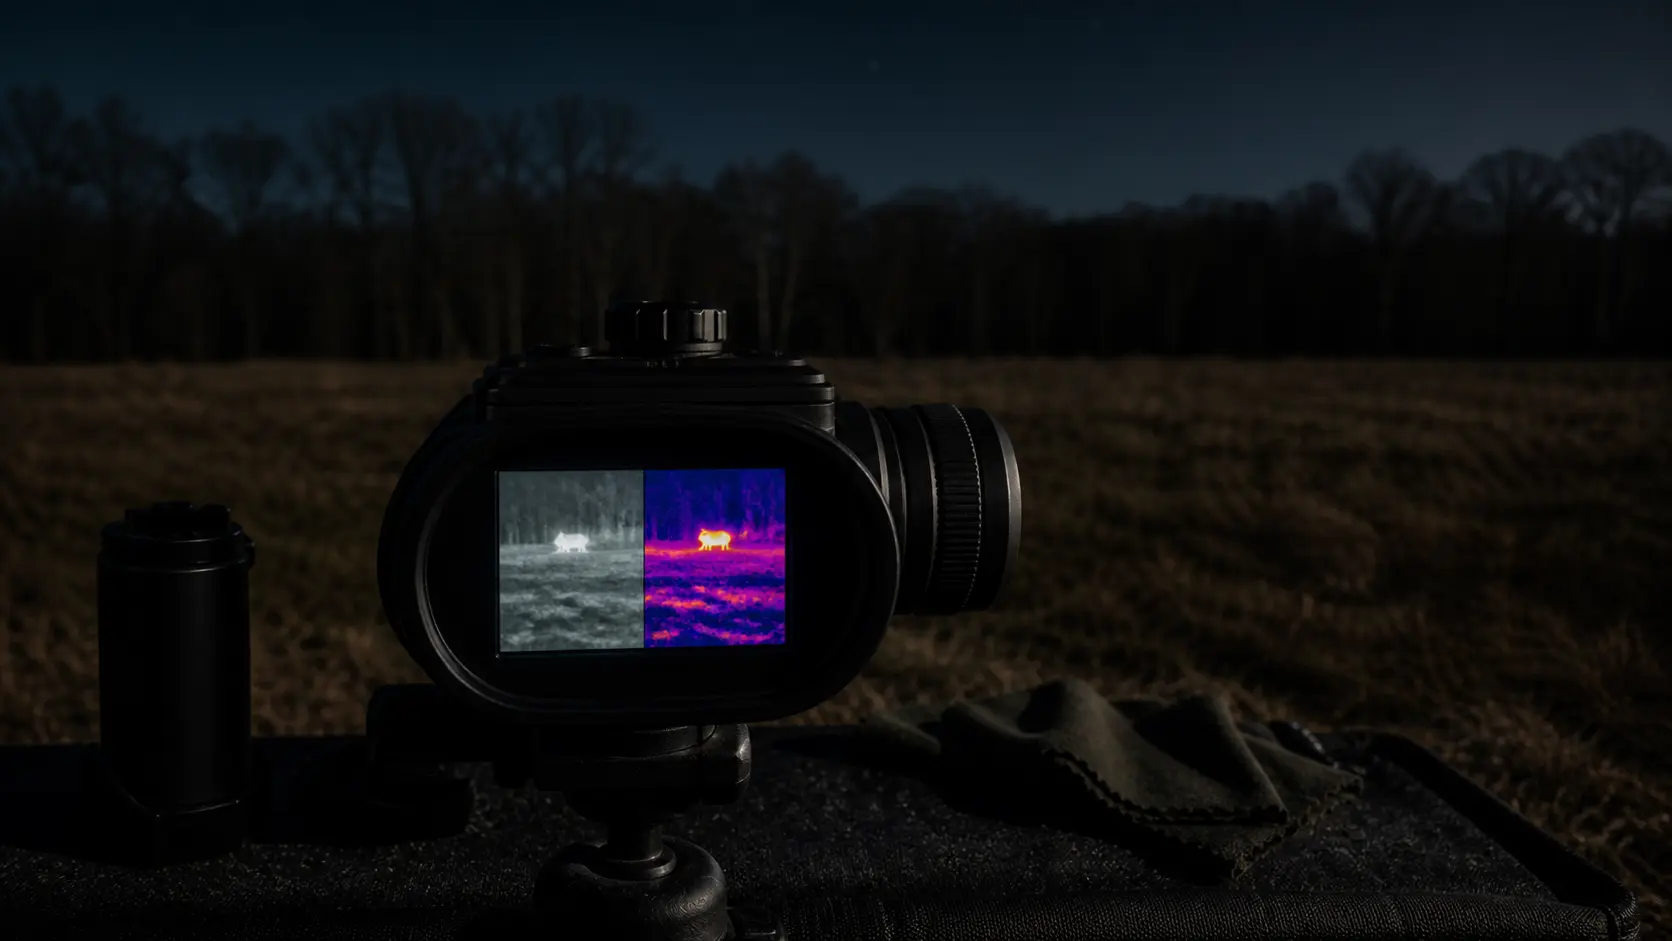
Thermal Image Settings Explained: White Hot, Black Hot, Palette, Contrast, Brightness, and Focus
Thermal sights don’t look great out of the box. Even with a great thermal sensor, large aperture lens, low NETD, and high-quality image processing, improper thermal settings can kill performance. On the contrary, a poor-sounding optic may look better with the right configuration of settings. Thus, understanding thermal scope settings is crucial for proper interpretation. Here’s how white hot, black hot, palettes, contrast, brightness, sharpness, focus, NUC, and all other settings affect the final image.
Quick summary
“White hot” shows warmer objects lighter or white. “Black hot” shows warmer objects darker or black. Color palettes use colors to distinguish temperature differences. Brightness regulates image luminance. Contrast regulates separation between warmer and colder areas. Sharpness or image enhancement affects edge definition. Focus changes target sharpness or blurring. NUC or FFC adjusts the detector.
Introduction
Thermal scopes do not operate with visible light as the camera and naked eye do. The sight captures infrared radiation from heat sources. The thermal sight has to interpret these thermal data and present it to the hunter in a comprehensible way. Thus, image processing is the core function of every thermal scope.
Improper settings can make it difficult to recognize the presence of animals. Moreover, some of them may ruin your thermal experience significantly.
Why thermal image settings matter
Good and bad settings examples
There are many ways to mess with your image. The following image looks too dark and flat. The background has too many distracting objects. The animal cannot be distinguished properly despite the right settings.
Compare the above-mentioned image with this one:
As you can see, good thermal scope settings can significantly increase image visibility.
Moreover, proper settings allow you to interpret the scene faster, detect animals quicker, and shoot them with fewer mistakes.
What are the main settings?
White hot and black hot
“White hot” is the most commonly used thermal setting. It shows hotter objects lighter or white. Cooler objects look darker.
White hot palette is simple and intuitive. Most users find it comfortable after a while.
Why? This setting provides the maximum flexibility during the hunting session since there is no need to switch palettes.
White hot is particularly useful for:
- field scanning
- detecting targets quickly
- general nighttime hunting
- beginners
- hunting scenes with high contrast between animals and background
- cooler nights
The disadvantage of white hot is that it may be excessively bright. Thus, your eyes get tired too quickly. The fine details become blurred.
Black hot vs white hot
Black hot can be considered the reverse variant of the white hot. Hotter objects are darker in the black hot mode. The cooler background becomes lighter.
The black hot mode is useful when you observe animals at night. This palette shows a sharp outline of bodies. Thus, it is recommended to use this setting for:
- evaluating animal bodies
- observing movements
- reducing the risk of eye fatigue for some users
- scenes where white hot feels too bright
- hunters who prefer a dark image
Like any other setting, black hot is not always better. Its usage is dictated by specific circumstances and your preferences. Moreover, you may try switching the setting in case your vision deteriorates over time.
What is the best palette?
Basic palettes like white hot and black hot are common across most manufacturers, but additional palettes vary by brand and model.
The common names of thermal scopes include the white hot, black hot, red hot, rainbow, and others. The exact names depend on the specific device and manufacturer.
What do these settings do? They change the representation of temperatures in the form of grayscale or colors.
Which palettes should I use?
Palettes are useful when:
- the scene lacks contrast
- the background is hot
- rapid target detection is necessary
- your eyes become tired from white hot and black hot
- you scan complex terrains
- you evaluate animals for a long time
Color palettes become harmful when:
- the screen becomes too busy
- they emphasize background objects and heat sources
- the target looks dramatic rather than detailed
- colors distract from observing shapes and moving animals
- the palette is incorrect for your terrain and scene
For most users, black hot and white hot should be used as the main settings. Other palettes are to be applied when they become necessary.
Red hot and target highlight palettes
Most thermal scopes have some special settings. These settings are meant for detecting hot objects or highlighting particular temperature intervals.
Such settings are good for:
- detecting the presence of an object
- rapidly scanning the field
- highlighting hot targets
- making the scene brighter
However, the red color cannot be relied upon because it may indicate various hot objects. Thus, red hot can show a rock or tree trunk, and even stored heat in the background.
The target highlight palettes are best when you scan and locate the prey. When you identify the animal, change the setting back to the black or white hot.
Sepia or low eye strain palettes
Some devices include a sepia option. According to the Sidekick manual by Armasight, this thermal palette is white hot in principle, but it is yellowish. The company claims that this setting can be useful for long-term observations.
Low eye strain settings can be applied for:
- long-time scanning sessions
- security observations
- handheld thermal sights
- people sensitive to bright screens
The downside of sepia and similar palettes is that they may not emphasize the targets as vividly as white hot, black hot, or other colors. Thus, if you are looking for fast targets, sepia may be not the right choice.
Brightness
Brightness is responsible for the screen luminosity level.
Setting brightness incorrectly is the most common mistake among thermal sight users. Although high values make the scene more vivid, they can reduce your vision quality too. Too bright screens make it difficult to identify targets.
Over-bright settings can:
- make the picture too flat
- obscure the target details
- obscure the reticle
- ruin the process of nighttime vision adaptation
- make the viewing process exhausting for eyes
Insufficient brightness values make the thermal picture dim. You won’t be able to detect some heat spots because their temperature is too low. In such conditions, hunting is practically impossible.
Contrast
The term “contrast” refers to the difference between cooler and hotter areas. As a rule, this setting should be applied in conditions of high background temperature. Contrast enhances separation of objects and adds depth to a scene.
Contrast is particularly important for hunting because it makes animals pop from the background.
How to adjust contrast:
- increase contrast when the animal is blending into the background
- increase contrast when you need more depth and definition
- increase contrast when humidity decreases the visibility of a thermal target
- decrease contrast when the image appears too harsh
- decrease contrast when you see too much background clutter
- decrease contrast when hot objects appear too large
Contrast is probably the most vital setting for your hunting conditions.
Brightness vs contrast
Do not confuse brightness with contrast.
While brightness affects the total level of image luminescence, contrast is used to highlight temperature differences between hot and cold areas.
The image below illustrates the distinction between the two functions:
To sum up, do not apply high brightness when the image has problems. Use appropriate contrast instead.
Sharpness and image enhancement
Modern thermal devices use image sharpening algorithms. Some models use artificial intelligence to improve the quality of target recognition.
AGM Rattler V3 has a sharpness adjustment. ATN ThOR 6 includes SharpIR technology based on AI algorithms. Pulsar and other top devices use similar approaches.
The advantages of image sharpening include:
- increased sharpness of targets and background
- enhanced edges
On the contrary, sharpness can introduce artifacts into the image. The excessive sharpening effect looks unnatural. In addition, background objects and clutter can start distracting the hunter.
Thus, apply the sharpening algorithm if you need additional sharpness. Reduce this value when the picture becomes too noisy.
Focus
Focus is one of the key settings which allows users to make the target sharper.
The majority of sights use the focus control ring or knob which can be rotated to achieve better image sharpness.
Pulsar manuals explain that you can adjust the object image by rotating the focus knob. Similarly, AGM manuals say that you need to turn the focus ring.
Thus, focus becomes one of the most important factors in hunting because you won’t be able to see the animal with insufficient values.
Correct focus ensures:
- sharp target edges
- increased ID range
- higher quality of digital zoom
- increased separation of the animal from the background
- improved readability of a thermal picture
You can notice that even a top-of-the-line model with a great thermal sensor fails if the focus is poor. In most cases, hunters focus at 50 yards or shorter distances. However, it does not mean that such an optic will look good at 250 yards.
Therefore, you must check your focus in accordance with the target distance.
Diopter vs objective focus
Do not confuse diopter and objective focus.
Diopter adjusts the eyepiece so the display, menu, and reticle look sharp to your eye.
Objective focus changes how sharp objects look in relation to the distance to your device.
Here is the correct process of setting your sight:
- First, adjust the diopter so the reticle and display look sharp.
- Rotate the objective focus ring to achieve the best target sharpness.
- Run NUC if the image has some artifacts.
- Adjust brightness.
- Set contrast appropriately.
- Choose a suitable thermal palette.
As you can see, diopter and focus play a key role in your hunting experience.
What is NUC? FFC and NUC explained
NUC stands for non-uniformity correction. Alternatively, you may hear the term FFC – flat field correction.
According to the Pulsar website, their products include the built-in NUC functionality. Moreover, you may choose automatic, semi-automatic, or manual NUC modes. Finally, this function requires you to close the lens cap in some devices.
AGM manuals discuss FFC and include modes such as auto, manual, or external depending on model. The ATN products have NUC as well.
Thus, what does this function do? The main purposes include:
- removal of vertical stripes from the screen
- elimination of artifacts
- reduction of uneven background
- image stabilization
- correction of sensor artifacts
- correction of non-uniform behavior
Whenever the thermal image deteriorates, start with NUC or calibration.
Semi-automatic vs automatic vs manual NUC
Automatic NUC means that your device corrects itself.
Manual NUC requires users to calibrate manually. Semi-automatic mode means that you initiate calibration but the sight performs most of the operations itself.
Automatic NUC is convenient because your device adjusts itself. However, this setting may become annoying whenever you perform calibration when it is unnecessary.
Manual NUC gives you control over calibration timing. Thus, this option is preferred for many hunters.
Scene modes and observation modes
Thermal sights sometimes include different scene modes and observation modes.
For instance, some Pulsar devices have Forest, Rocks, Identification, and User modes. Alternatively, AGM includes scene and warm/cold modes.
Scene modes are just presets. They can be useful for specific conditions.
Typical usages of thermal settings include:
- forest or low-contrast modes for scanning forests and bush
- rocks or high-contrast modes in dry and cold terrains
- identification mode for more detailed target analysis
- user modes with personal settings for brightness and contrast
The most aggressive preset does not equal to the optimal one in hunting conditions. Therefore, test different modes and find the best variant for your specific environment.
Tips and tricks
Digital zoom
Digital zoom does not create new sensor detail or true optical resolution.
At low digital zoom, image degradation may be less obvious. However, it becomes obvious with high magnification values.
The image quality gets poorer due to noise, artifacts, and sharpness. In addition, some palettes may appear inappropriate when zoomed in.
Thus, you should:
- focus again if needed
- lower the sharpness value if there is excessive noise
- adjust contrast if the target blends in
- prevent the picture from becoming too bright
- be aware that magnification does not create new details
Hogs
There are several recommendations for hog hunters.
For short fields and feeders:
- use white hot or black hot as a basis
- keep brightness medium
- make sure there is enough contrast between the target and background
- focus on the feeder or expected shot distance
- run NUC before the hunting session starts
For open fields, try black hot for identifying animal body outline and white hot for quick scanning. The hot target settings can be useful for detecting hogs.
Remember that hogs usually appear in groups. Do not overprocess the image so aggressively that every warm object turns into a distracting blob.
Coyotes
Coyotes are smaller and harder to identify. Thus, you have to be more attentive to settings.
First, you need to focus correctly to see them. Second, select a thermal palette which will emphasize body outline. Moreover, be more careful with digital zooming since you might misread the situation.
Finally, ensure that there is sufficient contrast between the object and the background.
Humid and hot nights
Warm and humid nights are a challenge for thermal optics. High temperatures reduce thermal contrast.
Here are some tips for such nights:
- raise the value of contrast
- use color palettes to distinguish between objects
- use scene modes designed for humid nights
- clean the lens
- apply NUC more often
- accept the fact that the ID range may be limited
Cold nights
Cold nights are good for thermal shooting because there is sufficient thermal contrast.
Sometimes, animals become too conspicuous. Thus, reduce brightness to avoid glow and decrease contrast to prevent blooming.
As usual, you should:
- use white hot or black hot as basic palettes
- avoid colorful settings unless you need them
- avoid hot stones, buildings, equipment, and similar objects
Scanning vs shooting
Scanning settings differ from shooting ones. When you are searching for an animal, you can apply the following:
- wide field of view
- low zoom values
- palette which emphasizes heat signatures
- moderate brightness
When you need to take a shot or identify the target, apply:
- correct focus of the object
- more natural palette
- controlled zoom if needed
- less eye distractor
- better reticle visibility
You can scan the terrain using one thermal palette and then change the setting for detailed analysis.
Reticle visibility
One of the essential things is the visibility of the reticle. It affects your ability to aim at the target quickly.
There are a number of thermal sights with changeable reticle settings. You may customize the reticle in terms of color, brightness, transparency, and type.
Thus, pick a setting which provides sufficient visibility and does not distract you from shooting.
Be careful:
- avoid red reticles in red hot palettes
- avoid white reticles in white hot scenes
- avoid black reticles in black hot pictures
- avoid excessive brightness of the reticle
Simple field setup
A couple of minutes spent before hunting is a worthy investment. Here is what you should do:
- Adjust diopter so the reticle and display look sharp.
- Choose white hot or black hot.
- Focus the object at the expected hunting distance.
- Perform NUC calibration.
- Set brightness so that the picture was not too bright.
- Adjust contrast to distinguish the target from the background.
- Add sharpening if needed.
- Select scene modes to improve image.
- Check reticle visibility.
- Test the settings in your hunting conditions.
It takes a couple of minutes but improves your chances greatly.
Typical mistakes
Improper usage of brightness
Too much brightness does not fix problems with contrast, focus, or NUC. Thus, pay attention to these settings separately.
Neglect of focusing
An expensive thermal sight is useless with poor focus. Do not forget to focus the object to see it properly.
Lack of NUC usage
Whenever your image suffers from artifacts, use NUC. It is a free and fast solution to your problems.
Constant application of colorful palettes
Colorful settings distract you and hinder the process of analyzing the target. Use them only occasionally.
Excessive usage of sharpness
Do not overdo with sharpening and make the scene noisy.
Forgetting about hunting conditions
Settings that work in humid woods may not work well in open fields. Do not forget about terrain when setting your device.
Comparison of scopes
Two thermal scopes should not be compared if they were not properly configured.
Conclusion
Thermal settings are key elements for interpreting thermal images correctly.
White hot and black hot palettes are standard for hunting. Color palettes are great when there are specific conditions. Brightness sets the total image luminance. Contrast regulates the difference between hotter and cooler areas. Sharpness influences edge detail. Focus determines object sharpness at different ranges. NUC cleans up thermal artifacts.
These settings are not the same for everybody. Their proper usage is dictated by hunting conditions, weather, optic, distance, etc.
The simplest approach is to adjust your device using the following steps: set diopter, set focus, use NUC, use white hot or black hot, moderate brightness, and enough contrast.
Can You Use a Thermal Scope During the Day? Daylight Use/Sun Safety and Zeroing Tips.
Night Vision Range Explained: Detection, Recognition, Identification, and Real Hunting Distance
How to Set Up an IR Illuminator for Night Vision: Placement, Beam Width, and Field Mistakes