Thermal Scope Range Estimation Explained: Stadiametric Rangefinders, Reticle Ranging, and Backup Methods for Night Hunting
Estimation of range via a thermal scope is not as easy as it seems. In this guide, we will discuss the role of the stadiametric rangefinder, reticle ranging, known landmarks and laser rangefinder in a practical night hunt.
Quick Answer: How to Estimate Range with a Thermal Scope?
The best way to determine the range of an animal with a thermal scope is to take all the guess work out of the equation before the animal appears on the screen. Measured distances, feeders, gates, ranch roads, or tree lines are more reliable than estimating distance from a flat thermal image without the lights.
If your scope is equipped with LRF, use it where the terrain and the target permit a clear reading. On a fixed stand, mark off common distances prior to hunt. a thermal scope stadiametric rangefinder or thermal scope reticle ranging can be useful if you don’t have a rangefinder, but these should not be considered precise—just other estimation devices.
The practical order will be as follows:
- Identify what you are looking at and be sure it’s a safe backstop.
- Rely on known-distance landmarks or laser rangefinder (if available).
- Do not use stadiametric/reticle range as a primary method of range determination.
- Take a conservative approach to your zero, holdover and personal shot limit.
This is a straightforward response to the question: “How to estimate range with a thermal scope”. It’s not a single button. It’s about creating multiple reasonable clues until you have enough assurance to make a safe decision.
Why Range Estimation Is Harder at Night
At night, when hunting, it’s harder to estimate range because many of the cues that your brain uses during the day are eliminated with thermal optics. A heat signature could be clear, bright and centered in the reticle, but you can’t say for sure if it’s at 120 yards or 240 yards.
Thermal Image Clarity isn’t distance certainty.
In a good thermal image, a target can be clearly distinguished from the background. That will help you see and track motion, but not distance. Thermal has no color, texture, shadows, fence wire, or grass detail compared to daylight glass.
That is how a hunter can see a hog or coyote from a long distance away and get the distance wrong. A large hog at 220 yards may appear to be the same size as a smaller hog at a distance of 140 yards. A coyote standing broadside in a clean field may appear to be closer than it really is as there are no objects surrounding it to measure against.
To learn more about this distinction, visit USA Night Vision’s article of detection vs recognition vs identification thermal scope range. It’s a very basic concept: just being able to see heat does not equal being able to make a decision on that heat.
Flat Fields, Brush, Fog and Digital Zoom Can Mislead Your Eye.
Open ground is one of the most difficult at night to estimate distance. A pasture, cut bean field or snow covered field may have virtually no reference points. The opposite is true of brush, where you may only catch a glimpse of the animal, and size-based ranging is not reliable. The image can also be blurry due to fog, humidity, rain and heat shimmer.
Digital zoom is an additional pitfall. It can help to magnify the subject presented on the screen, but does not generate additional heat information. When zoomed in (2x or 4x or 8x) the animal may appear to be closer to the screen, but the actual distance would remain the same. This can be helpful with targeting but can alter your innate perception of scale. This drawback is addressed by USA Night Vision in its post on thermal scope digital zoom explained 2x 4x 8x.
Detection Range vs Ethical Shooting Range.
One of the most common errors in thermal hunting is confusing detection range with the “shooting range.” A scope might be able to pick up a heat source much, much further away than you should shoot. Ethical shooting is not just a blob on the screen. Identification, safe backstop, confidence on distance, good zero and realistic hold are required.
That is important when considering the burning question: How far a thermal scope can shoot? A more pertinent question is: how far can you actually identify the target, ensure it is safe, estimate or measure the distance and place the bullet under real field conditions? For many hunters, that distance is considerably less than a manufacturer’s detection range.
What is a Stadiametric rangefinder on a Thermal scope?
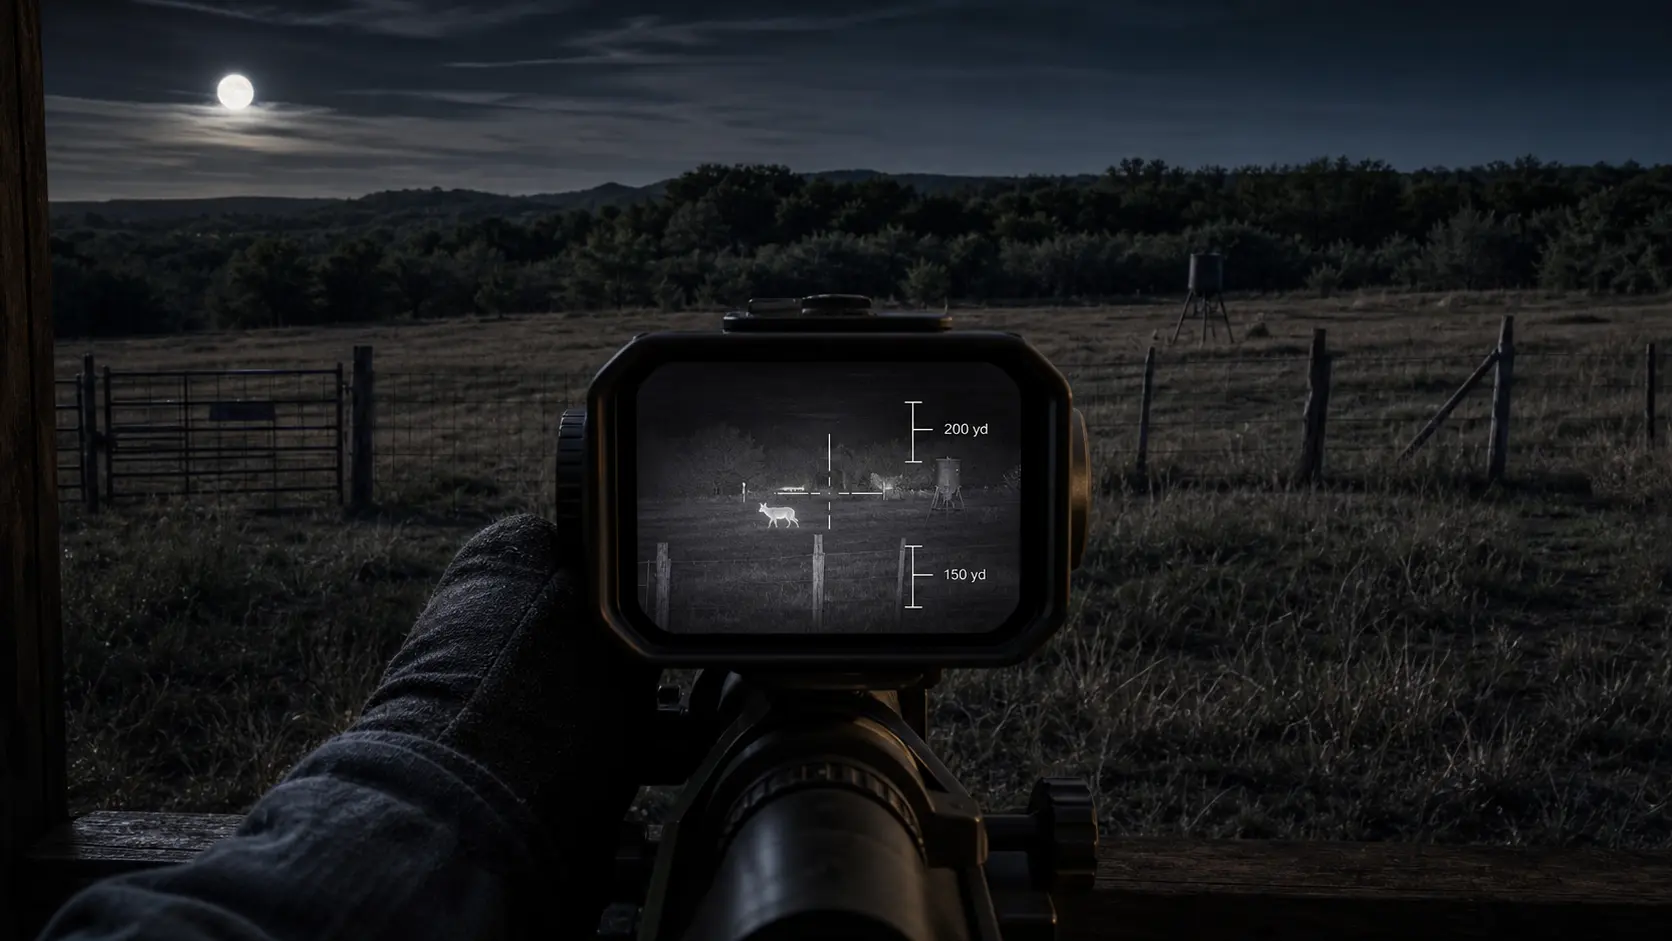
Stadiametric Rangefinder is a range finder that estimates range by target size. Typically, it’s one of the following: adjustable on-screen brackets, bars, or reference marks on a thermal scope. The concept is that if a person knows the approximate height or length of the target, the scope can be used to estimate how far away the target is, based on the size of the target in the image.
The concept is simple: known Target Size + On-Screen Brackets.
The maths fundamentals are straightforward: things at a distance seem a lot smaller than they are. A stadiametric rangefinder thermal scope is based on that relationship and allows for estimating the distance. The animal is bracketed between reference lines, target size is selected or assumed, and the scope provides an approximation of range.
This can help if you don’t have an LRF reading and if you don’t know a landmark. It can also be useful to help determine if the animal is in or out of your normal shooting range. But it can only be as good as the assumption of size and the representation of the animal in the image.
Common Animal Size Assumptions for Coyotes, Hogs, and Deer.
When hunting in the field, hunters can think in terms of animal size:
- Coyotes are relatively small targets with a narrow chest, and variable body posture.
- There is a tremendous variation in the size of hogs, ranging from a small pig to mature sows and boars.
- Body size varies with age, sex, region and angle; Deer can provide a higher profile.
Those differences matter. A coyote looking at you is not the coyote running through the field. A 90 lb. hog will not produce the same scale as a 250 lb. hog. When a deer is feeding with its head down, it may not be the height you had in mind.
The question is why Wrong Target Size creates Wrong Distance?
If the size of the target is incorrect, stadiametric ranging will not work. If you assume a hog is larger than it really is, you might think it is farther away than it is. If you think it’s smaller, you think it’s closer. Both errors can alter your holdover and shooting decision!
That’s why I consider stadiametric ranging to be a back-up. It is good as a quick reference point, particularly at known ranges, but would not be my sole justification for extending a night shot. Requires some familiar points of reference, local animal knowledge, and a set maximum distance.
A simplified explanation of how reticle ranging is performed.
Reticle ranging is determining the distance by using the marks displayed in your reticle. More manual than a built in rangefinder, and you have to get to know your reticle and understand how it magnifies and what size of target you are looking at before the pressure mounts.
MIL/MRAD or MOA Marks and Target Size
There are a lot of reticles that refer to MIL/MRAD or MOA. Estimate distance if you know the actual size of the target in real life and how many marks the target takes up in the reticle. This is a common rifle and optic skill but as thermal is digital, the edges of the target may not be "clean" and may not show up at a consistent contrast.
Basically, there are three questions which can be answered with thermal scope reticle ranging:
- What is the actual size of the object?
- What percentage of the reticle does it cover?
- What is the distance proposed by that relationship?
Well, on paper, it seems simple enough. It does not work as quickly at night if the target is moving, standing at an angle or partially obscured by grass.
Like any skill, reticle ranging needs practice before the hunt.
Avoid first use of reticles on live animal. Shooting in daylight and at night on known targets at known distances. Target or target posts with steel, barrels, feeder legs, fence posts, etc., at 50, 100, 150, 200, and 250 yards. Know the appearance of them in your scope at your base power and typical zoom powers.
This practice is also beneficial for thermal scope holdover. When your rifle is zeroed for 100 yards and your bullet begins to drop, mathematically, after 175 or 200 yards, you should know what that looks like on your reticle before you take the shot. USA Night Vision has a separate guide that covers thermal scope reticles, zero profiles, and holdover.
Digital zoom and Picture-in-Picture can alter your perception of what you are seeing.
Some thermal scopes have a way of keeping reticle subtension constant at different zoom levels, while others need a little manual work to determine how to keep it. Picture-in-picture can also help to make the center aiming view more detailed when the main field is wide. This may aid in aiming, but can cause confusion with ranging if you don’t understand what image scale you are using.
Make sure that you know how your scope works with magnification, digital zoom and PIP before using reticle ranging. Unless the manual explicitly states they have the same meaning at each setting and you have checked, do not assume that a mark has the same meaning at each setting.
Built-In LRF vs Stadiametric Rangefinder vs Reticle Ranging
The best hunting tool is the range tool that you use, and it depends on how you hunt. Different workflows might be needed for a coyote caller in open country, a hog hunter over feeders, and a ranch owner checking out a road at night.
Use the built-in laser rangefinder for the quickest and most accurate measurement when it works.
Usually the most accurate and fastest when a laser rangefinder is available and provides a clean return. In layman’s terms for thermal scope rangefinder explained, it is an instrument that tells the distance to the target or object near the shooter rather than relying on the shooter to make a distance judgment based on the size of the image. Maintains eye in the scope, important if an animal is moving. Additionally, it can input distance to a ballistic calculator that has a thermal scope feature, if it is available.
The limits are real-world. Bad readings can be caused by brush, grass, rain, fog, objects reflecting in the background or by pointing at the wrong object. LRF further include cost, weight, battery requirement, and electronics. USA Night Vision has written an article about thermal scope LRF vs no LRF for a more in-depth buying comparison.
The stadiametric rangefinder is a handy back-up, but only based on assumptions.
When you still have a clear view of the animal the stadiametric rangefinder is useful if you have a thermal scope without rangefinder. It could give you an indication if a target is likely near, medium, or far away. This is dependent on the size of the target, the angle and a complete body profile.
Don’t use it as a license to take a marginal shot with, use it as a backup check.
Reticle Ranging is more flexible but slower and skill dependent.
Reticle ranging is versatile – no need to use an electronic LRF. Can be used on animals, objects, fence spacing, feeder parts or known size references. The compromise is velocity. Practice, stable position and time to think.
Coyotes or a sounder of hogs may be too fast to reticle. It can be helpful for a calm target when the object to be targeted is close to a known object.
Known Landmarks is the least appreciated approach of feeders and ranch roads.
There are known landmarks that are better than any backup ranging feature. If your feeder is 96 yards from the blind, the far tree line is 180, the gate is 135 and the road bend is 220, you have your working range map already.
This is an easy, economical and reliable technique. This works particularly well for the thermal scope range decisions on feeders, bait sites, senderos and ranch roads for hog hunting.
Field Workflow for Night Hunters
The best night hunting range estimation process begins prior to the hunt. The idea is to minimize the decision making operating at the moment, as you have enough variables to contend with during the night hunting.
Prior to the Hunt: Mark Known Distances Around Stands, Feeders, Gates and Tree Lines
Prior to dark, familiarize yourself with the common landmarks. Write them down. When hunting more than one stand, make notes about each stand hunted. An example of a simple note would be:
- Feeder: 88 yards
- Left gate: 122 yards
- Far fence corner: 174 yards
- Big oak: 205 yards
- Brush to the back of the feeder: 236 yards
Then compare those distances with your zero and actual bullet drop. Work out the zero distance of your thermal scope if it reads 100 yards and know where your rifle will read at 150, 200, 250 yards. This is explained by USA Night Vision in its article Thermal Scope Reticle Zeroing Explained 2026.
When the hunt is on: Identify-THEN-Range-THEN-Apply holdover
In the field, it is important to follow the sequence:
- Determine the target and ensure it is legal and safe.
- Check for a backstop and for what is beyond the target.
- Approximate or measure range.
- Use appropriate holdover or ballistic solution.
- Only take the shot if all of those pieces make sense.
Don’t do that the other way around. If you haven’t identified the target, a range number is of no assistance. But a safe backstop is essential for a perfect hold.
Postfire: Document what went right and revise your Range Notes!
Update notes after the hunt. If a coyote walked through the field, close to the terrace, and later you walked range in that area at 210 yards, record it. If hogs continue to enter at a low point (145 yards), mark it. Your property will be more accessible to thermal in the long run.
This is the way that expert night hunters get quicker without thinking more. They create a mental map of actual distances.
Points deducted due to common errors.
Most thermal miss is not due to a single issue. These errors are the result of committing little mistakes, such as inadequate identification, poor estimation of range, incorrect estimation of zero, excessive digital zoom, and a hurried grip.
Trusting Detection Range as Shooting Range
Detection range indicates a distance for the detection of heat. Shooting range is to make a responsible shot. Keep those separate.
A simple rule of thumb is to use one average animal size per coyote or hog.
It is a stadiametric frequent mistake. Coyotes, hogs and deer are too variable to have a single size assumption. The error increases when the animal is angled, feeding or partially concealed.
Forgetting Zero Distance and Bullet Drop
Even if you have a good range estimate, it’s not going to help you if you don’t know your rifle. The bullet, barrel, suppressor, zero, scope height and ammunition are all important. Zero and drops are real world, not just in an app.
Ranging Through Brush, Tall Grass, or Partial Heat Signatures.
The brush can obscure some of the animal, or can be a source of false scale or laser return. The lower body may be concealed by tall grass. Partial heat signature is not a good ranging reference.
Long shots will be taken if a distance is not confirmed.
Long shots make all mistakes seem like glaring errors. When uncertainty exists in distance, ID, backstop, wind & hold, pass the shot / close the distance.
Practical Examples
Let’s look at the range-estimation process in typical night hunting scenarios.
Coyote crossing a field at 150-250 yards.
The big problem with coyote hunting thermal scope range is the smallness of the target and the fact that it is sometimes on the move. A built in LRF can be useful to get a quick reading if a coyote is crossing a field; it lets you keep behind the rifle.
If you cannot use LRF, use known landmarks first. When the coyote moves from a 175 yard terrace into a 230 yard fence corner, you will know the general area. Reticle ranging may be useful if the animal stops broadside, but do not waste time calculating while the animal is in motion. If the coyote is farther than your holdover distance, just let him go or continue to call.
USA Night Vision has a guide to thermal scopes for coyote hunting 2026 if you are looking for setup ideas.
Known distance between a hog group at a feeder.
The cleanest way is known feeder distance with regards to hog hunting thermal scope range. With many common configurations, the shot is still close enough for a simple decision if the feeder is 92 yards and the sounder is ten yards behind it. Your pre-ranged notes will tell you when holdover becomes an issue if the hogs are moving to the far brush line at 190 yards.
When a herd is tight there is not as much benefit to having a stadiametric rangefinder because the animals overlap and the sizes are different. In that case, landmarks are superior to body size estimation. For all things related to thermal vision optics for hog hunting, take a look at USA Night Vision’s best thermal scopes for hog hunting in 2026 guide.
Ranch Security Scan Where Identification Matters More Than Shooting
Range is not as important as identification and behaviour for ranch security. A heat signature by a gate, barn or road could actually not be a shooting problem at all. Before taking any action you may need to identify the source of the problem — whether it’s livestock, a person, a vehicle or an animal.
In this instance, familiar landmarks can still come to the rescue. Communicating location is easier if you know how far away the gate is, e.g. 160 yards, and the heat signature is beyond the gate. But it’s not about holdover, it’s about identification, context and safety.
FOR THERMAL SCOPES WITH LRF: WHEN YOU SHOULD PAY FOR THE THERMAL SCOPE.
While not a requirement for every hunter, a thermal scope equipped with LRF can be more useful as the range increases, as there was no longer any cover, and shots are becoming less predictable.
Solo hunting, long shots and open fields.
Take note of LRF if you’re hunting open fields, calling coyotes, shooting more than 150-200 yards frequently, or hunting by yourself without a partner spotting and ranging. Being able to range from the scope can make the entire operation easy.
Also, if you have more than one rifle/profile, and your scope can be linked with range data to a ballistic solution. Just keep in mind that you’ll still need correct input data for the ballistic calculator.
There are times when using a Non-LRF Scope is still the right choice:
If the majority of your hunting is at a known distance, in tighter wood, around feeders or you’re on a budget where you need more image versus additional electronics, then a non-LRF scope is the correct choice. You might be better off with a better sensor, lens, field of view, or display than with an LRF that you don’t use much.
Practical aspect of thermal scope LRF vs no LRF. If you typically shoot 75 – 125 yards at well-known targets, you might find an LRF useful, but not necessary.
The best output needs good input, with a ballistic calculator.
A thermal scope ballistic calculator is only as good as the data used in it. The solution depends on range, muzzle velocity, ballistic coefficient, zero distance, sight height, ammunition consistency and environmental assumptions.
If the entered range is incorrect the calculator can display a result with confidence that is incorrect. Therefore, range estimation is still important despite the advent of more sophisticated electronics.
Final Takeaway: Use Range Estimation as a decision tool, not a guess!
Thermal scope range estimation isn’t finding a way to make a backup method as accurate as a laser. It’s about improving the decision making process in the dark.
Wherever possible, refer to familiar landmarks. When possible, use a built-in or handheld laser rangefinder. Adopt the use of stadiametric and reticle ranging as a supplementary ranging method where suitable in terms of the size of the target, the takeoff angle and the quality of the image. Maintain zero, know your holdover and be conservative with the unknown distances.
The simplest system for most hunters is to pre-range the property, know your rifle, identify before ranging, confirm a safe backstop and make sure that you never shoot a distance you haven’t practiced. This will provide more real night hunting success than a bright image and guess that the hold will be close.
Can You Use a Thermal Scope During the Day? Daylight Use/Sun Safety and Zeroing Tips.
Night Vision Range Explained: Detection, Recognition, Identification, and Real Hunting Distance
How to Set Up an IR Illuminator for Night Vision: Placement, Beam Width, and Field Mistakes