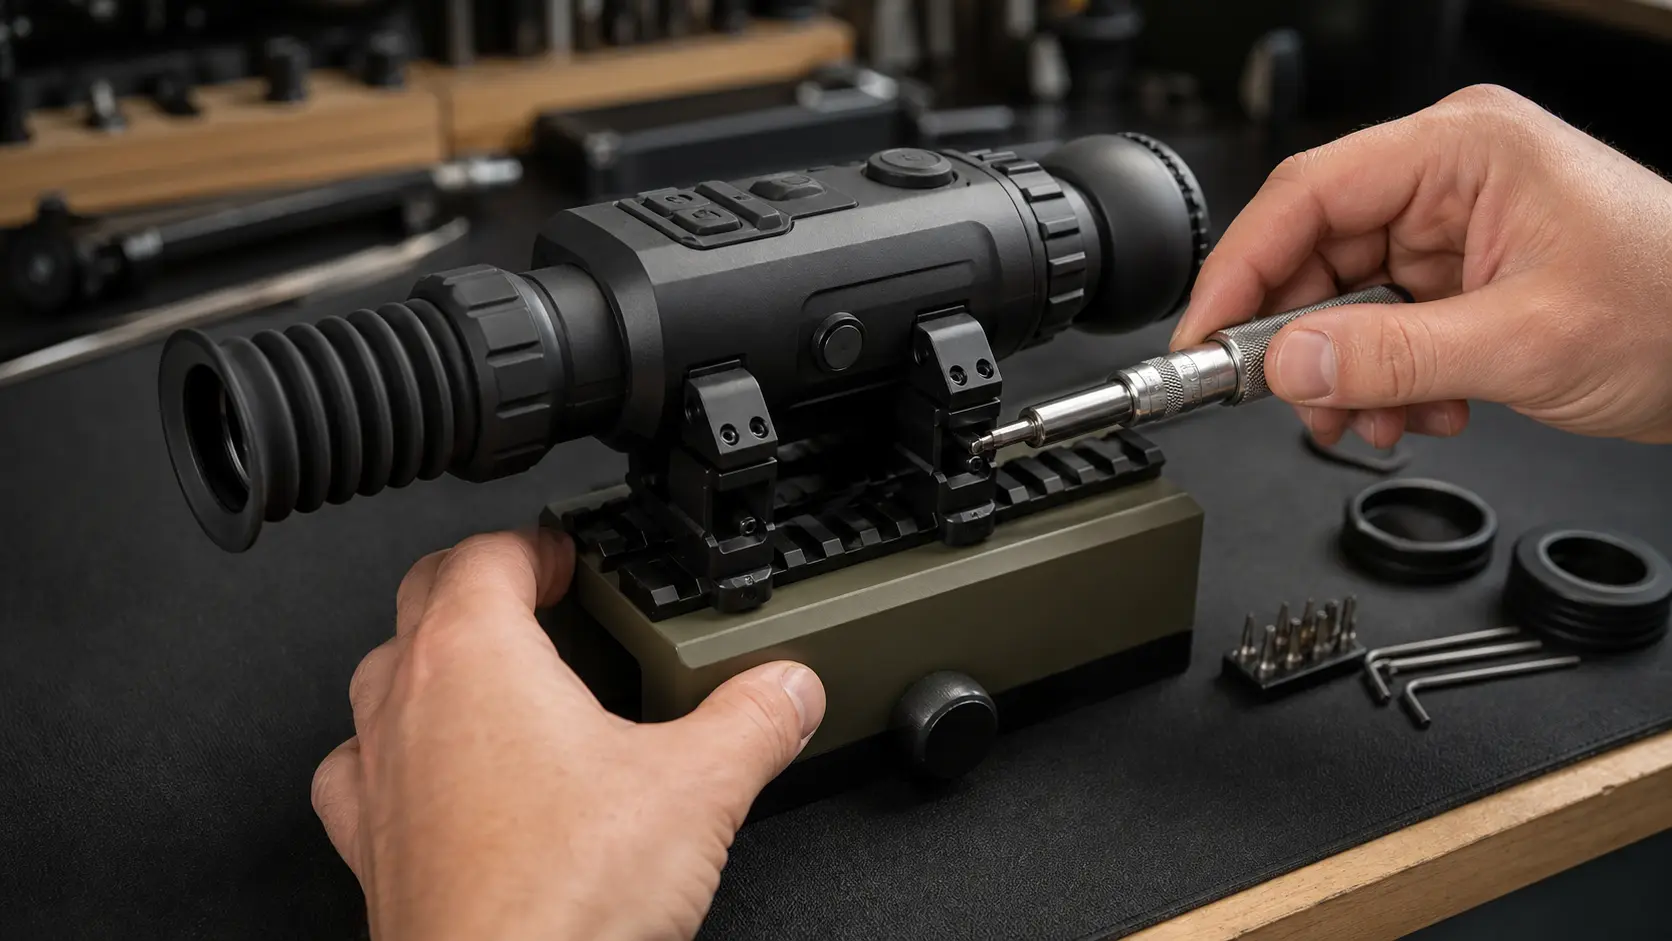
How to Mount a Thermal Scope: Height, Eye Relief, Torque, and Zero Retention
Installing a thermal scope is more than merely a mechanical task prior to zeroing. It’s what makes the rifle come up naturally in the dark, if the controls are easy to reach with gloves on, if the charging handle or bolt will not interfere with the optic… etc. I’ve witnessed people complaining about wandering zero that’s actually because they either had a loose Picatinny thermal scope mount, uneven ring torque, a scope positioned too far back, or a zero profile that they had on the wrong rifle.
It is important to note that this thermal scope mounting guide is for dedicated thermal rifle scopes and not clip-on thermals. This different alignment and collimation process is addressed separately in Thermal Clip-On vs Dedicated Thermal Scope. The oft-repeated advice for a dedicated scope is to set it up first, then mount it with the proper hardware, and then test it with actual ammunition before going on to hunt.
Quick Answer: The Correct Thermal Scope Mounting Workflow
For a quick and simple guide on how to mount a thermal scope:
- Ensure the rifle is unloaded and safe to work on.
- Attach the optic to the intended rail, ring or dedicated thermal scope mount.
- Mount completely on the receiver rail, do not bridge across unstable areas of the rail.
- Set thermal scope mount height for a natural cheek weld and usable clearance.
- Shoulder the rifle and adjust thermal scope eye relief before tightening anything.
- Ensure charging handle, bolt handle, suppressor, cable, sling and tripod clearance and focus-ring clearance.
- Position mount consistently against recoil forces.
- Screw up sequentially in increments per manufacturer recommended torque specs.
- After final tightening, mark screws to enable easy detection in the field.
- Live fire with zero profile and visible thermal target to confirm zero.
Always use the appropriate rail or ring interface.
Make sure to not assume that all thermal scopes attach the way a conventional daylight scope does. Some have an inbuilt direct Picatinny mount. Some opt for 30mm or 34mm rings. Others have a proprietary QD mount that they use on their thermal scope. Please read the scope manual and the mount manual before use. If the scope is a factory mount check to see if it is compatible with your rifle rail and recoil level.
Adjust eye relief and cheek weld prior to tightening.
You may be able to use it but is the configuration correct? The rifle should come to your shoulder naturally, with your cheek landing in the same place each time. Before torqueing the screws, adjust the position if crawling the stock or raising the head or rolling the face off the comb is necessary to see the display.
Check charging handle, bolt and suppressor clearance and accessory clearance
In the AR-15 thermal scope world, charging-handle clearance can make the night good or bad. For a bolt rifle, ensure that the bolt handle does not interfere with the eyepiece and mount. If using a suppressor, tripod, external battery, sling or vehicle rest, inspect them now, before dark.
Apply torque in increments and check zero using live fire.
It is not standard practice to specify thermal scope torques. Refer to the manufacturer’s manual for the scope, rings, mount and rail base. Tighten up equally and slowly. Once mounted, there is a need for zero confirmation. A hunting thermal scope is not ready because the screws feel tight, it’s ready when the rifle prints a confirmed group where the reticle says it should.
Why Thermal Scope Mounting Is Different From Daytime Scope Mounting
Manufacturers of thermal scopes also offer them in various shapes, weights and controls.
A thermal scope that is dedicated typically has more electronics than a standard optic. The eyepiece, battery compartment, focus ring, menu buttons and objective housing may be in different locations than you expect. There are some small and compact thermal scopes. Other objective housings or control clusters are larger, which impact on ring placement, rail placement and accessory clearance.
That alters the mounting of the optic. You’re giving place to the objective bell! Making space for cables, buttons, battery door, throw levers, charging handles, bolt handles, and adjusting focus during a stand.
Digital reticles and zero profiles may mask mounting issues.
It is useful if used when one optic is being swung between rifles or ammunition loads, particularly for digital zero. They also have the ability to conceal poor mounting practices. If it looks like it’s a problem, but you’re still adjusting the zero profile in the course of the mount shifting, it might actually be a mechanical problem. For more details on profiles, holds and thermal scope’s point of impact shift, consult Thermal Scope Reticle and Zeroing Explained (2026).
The problem can appear to be either a scope issue, sensor issue, or a firmware problem.
The symptoms may appear electronic, including missing shots, a group that walks, or a zero that appears to shift during transport, and may be caused by a loose rail screw, uneven ring cap, dirty rail slot, or an inconsistent QD lever. Check the mounting system from the rifle up before blaming the sensor, firmware, reticle or ammunition.
Step 1: Verify the Rifle Platform & Mount Type.
AR-15 and AR-10 flat-top receivers
If the rifle has a true flat-top Picatinny receiver, the thermal scope is typically easy to mount. Mount to the upper receiver. The optic’s reference surface is the stable surface the receiver should be. The free-float handguard is great for lights, lasers, and bipods, but it is not the ideal location to span a thermal scope mount.
The AR-10 follows a similar logic, although recoil, rail size, charging-handle access and stock height will all affect the choice of mount. If your rifle has a raised rail, monolithic upper or an odd stock, try different body positioning before settling for a standard height.
Bolt action rifles and Picatinny rails
For bolt rifles, the most popular base is a sturdy Picatinny rail bolted to the receiver. Ensure that the rail is clean, suitable and set mounted correctly for the rifle. If the rail has built-in cant, know how this will impact the available adjustment but use it as a means to an end rather than a replacement for good zeroing.
Another clearance problem with bolt rifles is the bolt handle itself. Cycle the bolt hard, not gently, and ensure it does not catch in the eyepiece, throw lever, ring cap or any battery cable that may be attached to the rear.
Direct Picatinny mounts vs 30mm/34mm rings vs proprietary mounts
A direct Picatinny thermal scope mount is the same type that typically mounts the scope right onto the rail, using an integrated base. Thermal scopes that are ring mounted will need the correct tube diameter and ring spacing. While it may be convenient, proprietary mounts still need proper rail placement, torque and zero verification.
Do not force ring size, shim a scope tube with improvised material, or combine unknown hardware due to fitting the optic. The price of thermal scopes is high and a poor interface can harm the optic or destroy thermal scope zero retention.
Don’t bridge a receiver and free-float handguard.
Bridging is the process of attaching a portion of the mount to the receiver and a portion to the handguard. Avoid it. A good handguard can move slightly under the load, tripod pressure, sling tension, barricade pressure, and/or vehicle-rest pressure. Little movement at the mount can make a big point-of-impact shift downrange.
Step 2: Select the appropriate mount height:
The AR-15 centerline height and cheek weld
Thermal scope mount height on AR should help move the rifle up into position from field positions, while maintaining a natural head position behind the scope. A lot of AR optics have familiar centerline heights, but this should be used as a guideline rather than a rule. Everything from stock shape to face structure, shooting position, wearing a helmet, and shooting from sticks or a tripod is important.
The outcome is repeatability. If the rifle comes up and your eye falls behind the display, without looking for the image, then the height is close. Change the mount height if you need to raise your cheek off of the stock or force your face down unnaturally.
Bolt rifle ring height and objective clearance
The height of the ring on a bolt action rifle should be sufficient to clear the objective yet not so high as to lose a consistent cheek weld. Tall rings are not necessarily more tactical or provide more space. If the head is floating too high, the shot may be less stable in the field.
With caps on the lens, focus and any rail mounted accessories, make sure the clearance is checked. A set-up that passes on the bench may not pass with a suppressor cover, tripod saddle, or an external battery cable.
Helmet, suppressor, and tripod considerations
Some shooters require additional height due to the type of headgear worn, heavy clothing, high combs or tripod shooting positions. However, suppressors can affect setup as they alter balance and can introduce other heat mirage issues in front of the optic. In some instances, higher can help, but it should help address a genuine problem, rather than address a new “cheek-weld problem”.
Why higher is not always better
While standing on a high mount, it can feel fast, but can collapse from prone, sticks or a tight vehicle window. The greater the height, the more crucial it is to know mechanical offset well up close. If there’s an uneven terrain in the vicinity of the feeder, or a coyote that’s calling you, consistency is more important than being a trendy height.
Step 3: Position your eye relief and scope position.
Mount the rifle naturally before tightening the mount.
Prior to tightening the mount, try several times to shoulder the unloaded rifle while wearing your regular hunting attire. Perform it standing, kneeling, from sticks and from real positions. With eyes closed, mount the rifle, and then open your eyes again. If it is centered but not moving your head, then it’s close.
Examine the image for vignetting and head position, and ensure image quality.
The eye relief of a thermal scope varies by model, and should be followed according to the manufacturer manual. In reality, you would like to see a fully visible and usable display with no vignetting, stretching or limiting head position. The scope may be too far forward, back or up or down if inconsistencies are found as you mount the rifle.
Don’t mount the optic too far back.
Many AR shooters prefer to have a thermal farther back for several reasons: compact red dots, or wanting a bright, easy-to-view bench display. In the field, this can get in the way of the charging handle, crowd your nose or cause an unbalanced stock. In a rifle with a bolt, a rear mounted optic may disrupt the bolt’s lift and/or obstruct the shooter’s hand when speed cycling the rifle.
Make sure charging-handle and bolt-handle clearance is adequate.
Thermal scope charging handle clearance is mandatory on an AR. Holding a normal grip and with gloves, pull the handle. If using an ambidextrous or extended handle, try both hands. Cycle bolt on purpose with bolt rifles. If your knuckles hit the optic or mount, adjust the optic or change hardware, and then re-zero.
Step 4: Make sure that the scope is level, seated and tightened properly.
Before installing, clean the rail and check the screws.
Clamping consistency can be diminished by burrs, paint, thread damage and dirt. Before assembly, clean the rail, look at the mount and test all the screws. If the screw starts to feel rough or bottoms out too soon, then stop and check it. Never fix a hardware problem with more torque.
Always seat the mount against the forces of recoil.
Make sure to ensure that you put a Picatinny thermal scope mounting bracket in the designated rail slot and press it firmly against the rail lug surface that will resist recoil. It is the repeatability that’s important. If the optic is to be removed and then reinstalled, it should be reinstalled in the same place and seated the same way.
If the scope has rings, apply the same pressure to all of them.
If the scope uses rings, keep it level and tighten the ring caps evenly and gradually. Look at the gap on either side of the cap. Ring pressure that is not uniform can cause a ring to be marked, cause stress to the housing or cause wandering zero. Never rotate the scope when the rings are almost closed; loosen and reset them.
Use manufacturer torque specifications, not educated guesses.
Thermal scope torque is dependent upon optic, mount, ring, base and screw diameter. All thermal scopes have no fixed value. Use a good quality inch pound torque wrench, the scope and mount manuals. If the manuals are contradictory, call the manufacturer or mount maker before writing final specs and/or using a memory value.
Mark screws after completion of the final tightening to be inspected in the field.
Once torqued, make a small mark on screws and clamps. It is not a substitute for inspection but it lets people know when they can move while on the hunt. Checking screws after the first range session as well as after rough travel are also things I like doing. If you’re looking for more general post-hunt maintenance for your hardware, check out Thermal Scope Maintenance: Field Care That Actually Matters.
Step 5: QD Mounts and Return-to-Zero Expectations
What a QD mount can and cannot guarantee
If one optic is moved from rifle to rifle or if one optic is removed for transporting, then a thermal scope QD mount is convenient. Convenience is not a certainty. With proper installation, a good QD system can be repeatable, but thermal scope return to zero still depends on the rail fit, lever tension, choice of the right slot, recoil, and the consistency with which you reinstall it.
Always use the same rail slot.
Write the location of the rail slot on the rifle or in the rifle notes. The optic can be shifted one slot forward or back which will affect balance, eye relief, cheek weld, and P.O.I. If a rifle has multiple rifle profiles, clearly label them as rifle/ammunition/mount position.
Be sure to maintain the same tension when using a lever.
QD levers should fit snugly, and not need abuse. If the tension on the lever can be adjusted, adjust it as per the mount maker’s instructions. Never keep increasing the lever pressure to correct a zero when there is a possibility of rail, mount or recoil lug failure or ammunition inconsistencies.
Please recheck zero after first installation & after rough transport.
All new mounts, QD or fixed must be live-fired. Reconfirm after removing and reinstalling the optic, before airline or ATV travel, after a hard drop or before an important hunt. If you’re looking for a more general zeroing guide, How to Zero Your Night Vision Scope is a helpful resource.
Step 6: Accessory and Field-Use Clearance
Suppressors and objective clearance
A suppressor alters the rifle’s balance and may add heat in the optic’s forward view. Ensure that the objective, lens cap and focus ring can be used with the suppressor in place. Never find out that the cap is flipping into the suppressor cover or focus ring is obstructed by waiting until the first stand.
External battery cable routing
The external battery cable for a thermal scope should be short enough to avoid snagging and long enough to allow normal movement. Try to keep it away from the charging handle, bolt, ejection port, sling and support hand. If you use the external power frequently, check the comparison of the setup with the runtime and cable factor in Thermal Scope Battery Life Guide.
Sling, tripod, bipod or vehicle-rest interference
The night hunter typically hunts from a tripod, sticks, gates, UTV rails, or from a close window. Test the rifle in the conditions for which it will be used. Pressure applied to the rifle by a sling swivel, tripod clamp, bipod or vehicle rest may alter the shooter’s position behind the scope.
Keep buttons, focus ring and battery compartment accessible.
Thermal image quality is dependent upon focus, contrast, the palette selected, NUC behavior, and target presentation. In the field, the set up will be frustrating if the mount obscures the focus ring or creates difficulty in accessing the menu buttons. For pre and during zeroing adjustments of image see Thermal Image Settings Explained 2026.
Step 7: Zero Confirmation After Mounting
Set up a thermal target that can be seen.
A paper target without a heat source, thermal contrast or a specifically designed aiming point is not likely to be a good thermal target. Point at a target that the thermal can see consistently and clearly. Confirm focusing and image settings before pursuing zero adjustments.
Verify the zero profile.
Prior to firing, check the rifle, ammo, distance, and zero profile. When working with digital scopes it is easy to choose the wrong profile and still be able to see a normal reticle. This error may manifest itself as a mounting failure or an ammunition problem.
Take multiple shots at a confirmation group, more than one.
The first shot only provides a vague clue to the actual zero retention. Shoot a group, make adjustments according to the scope manual, save the profile and then shoot another confirmation group. Another thing for hunting I want is a final check from the position which I am going to use the most, like sticks or a tripod.
Check for POI shift after removing and reinstalling the optic
Before attempting this procedure to remove the optic, test it, if you intend to do so. Take it back out and put it in place again using the same method and take another group. Record the result. For some close range hog hunts, a slight shift might be okay and may be unacceptable for longer coyote shots. The rule is: know, don’t assume.
Common Thermal Scope Mounting Mistakes
Installing on an unstable part of the rail.
The most frequent error for the placement of the rails is bridging the receiver and handguard. The second is the use of a loose, damaged or improperly installed rail. The first step in placing a thermal scope is ensuring that you have a stable receiver interface.
Eye relief and cheek weld are also disregarded.
The accuracy in the field will suffer if the position of the head changes each time the rifle is mounted. Even with the electronic display, thermal scope cheek weld is important. The rifle should hit your face in the same spot every time.
Over-tightening rings or crushing tube.
Exceeding the manufacturer specification is not more secure with more torque. If the screws are over tightened, the optic may be damaged, the tube may be warped, screws may strip, or pressure may become uneven. Follow the manual and torque wrench.
Perhaps you forgot to save or pick the right zero profile.
Even with the correct mechanical set up, the wrong digital profile can cause a miss. This is particularly important when switching between an AR-15, bolt rifle, and various ammunition types.
Before blaming the optic, check screws, rail, and ammunition.
Simple items to check when a group moves: Rail screws, mount clamps, ring caps, ammunition lot, suppressor attachment, QD lever tension, and zero profile. Only after the mechanical setup checks out should you consider the optic.
Field Checklist Before the Hunt
Hardware check
- Unloaded rifle before inspection or adjustment.
- Mounted properly in the correct rail slot
- All ring caps and clamp screws inspected against witness marks
- Rail base secure
- Access to lens caps, focus ring, and controls.
Battery and cable check
- Internal battery charged
- External pack secured if used
- Cable off the action and support hand
- No cable tension when shouldering or cycling the rifle
- Extra power plan packed for long stands
Profile and reticle check
- Proper rifle profile chosen
- Correct ammunition profile – if applicable
- No clutter on reticle
- Range note or dope card confirmed
- Image settings tested for typical terrain
Zero confirmation and range note
- Live-fire zero confirmed before hunting
- Confirmation group fired, not just a single shot
- QD removal and reinstall tested if the optic will be removed
- Point-of-impact shift recorded if any
- Practical hold notes confirmed for the expected distance
If hunters are still deciding on the rifle/optic combination, then Best Thermal Scopes for AR-15 Platforms and Best Thermal Scopes for Hog Hunting in 2026 are helpful to have as reference. However, the mount and zero process determine if the setup is trusted in the field once it’s on the rifle.
Final Recommendation
There is no one single optimum mount height, torque setting or rail slot that will provide the best answer to how to mount a thermal scope. This is a process that can be repeated. Use an unloaded rifle and proper equipment. Put the optic on a solid receiver rail. Select thermal scope mount height at natural cheek weld (not trend). Adjust the eye relief prior to tightening any components. Allow clearance for the charging handle or bolt. Follow the manufacturer torque specifications, label the screws, and consider QD return-to-zero as an item to verify with live fire.
If the image looks great in the driveway, the thermal scope isn’t necessarily ready for hunting. It is ready when the mounting system is secure, the body position is repeatable, the right profile is saved and the thermal scope zero check is proven on a visible thermal target prior to the first stand.
Can You Use a Thermal Scope During the Day? Daylight Use/Sun Safety and Zeroing Tips.
Night Vision Range Explained: Detection, Recognition, Identification, and Real Hunting Distance
How to Set Up an IR Illuminator for Night Vision: Placement, Beam Width, and Field Mistakes